 Younès Benallal
How to Add a Chatbot to Your Website: A Complete Guide 2025
Adding a chatbot doesn't just modernize your site. It transforms from a digital brochure into a 24/7 conversation engine. Captures leads, answers questions, and guides visitors precisely when their interest peaks.
The difference between implementing a chatbot and continuing without one isn't merely aesthetic. It's the difference between passive content consumption and active engagement that drives measurable business outcomes.
Why Every Website Needs a Chatbot in 2025
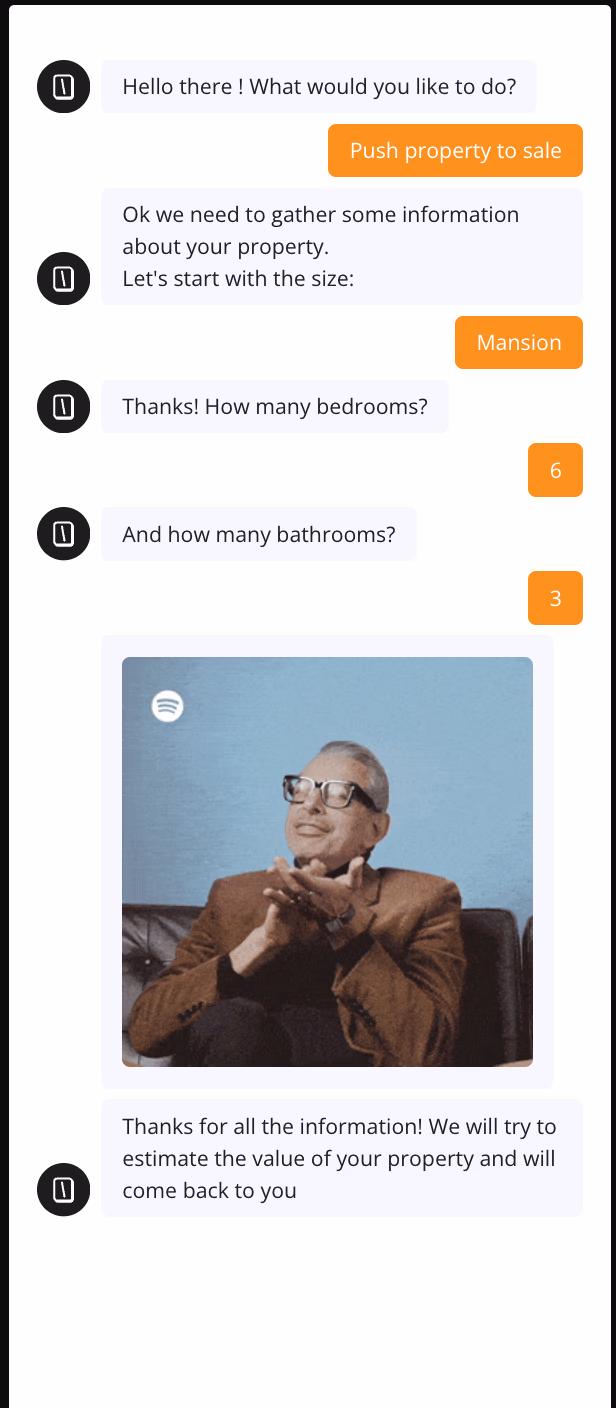
A potential customer visits your pricing page late at night, ready to decide. They have questions about your enterprise plan. They are asking for company size, budget, industry, and a detailed explanation of their needs.
By the fourth field, they lose interest and leave—likely to a competitor offering instant support.
This situation is common. Traditional contact forms create barriers, turning simple inquiries into daunting tasks. Visitors see long lists of required fields and weigh the effort against uncertain benefits. Most choose to leave.
Lengthy forms drive away two-thirds of potential conversions before users start filling them out. Each extra field increases abandonment, a behavior known as "completion anxiety."
From Static Websites to Interactive Experiences
Websites have evolved from static brochures to dynamic platforms, but many still use outdated engagement methods. Adding a chatbot changes this by inviting visitors into a conversation instead of presenting forms.
This shift improves user experience. For example, a chatbot might ask, "What's your biggest challenge right now?" instead of immediately requesting a budget. The dialogue feels natural and collects the same information without the stress of form-filling.
Users expect quick, conversational interactions similar to messaging apps. A chatbot meets these expectations, qualifying leads more smoothly and effectively than static forms.
ROI Impact: 24/7 Support and Lead Generation Automation
Chatbots offer benefits beyond user experience. Businesses see clear improvements in key metrics.
Customer support costs drop as chatbots handle routine questions about pricing, features, and accounts. One bot can manage hundreds of conversations simultaneously, freeing your team for complex tasks.
Lead qualification becomes consistent and reliable. Every interaction follows a logical flow, ensuring no opportunity is missed. High-value prospects go directly to sales, while others receive automatic nurturing.
The results include higher conversion rates, reduced support workload, and happier customers. Visitors get immediate help, support teams focus on meaningful work, and sales teams engage with better-qualified leads. Within weeks, the chatbot proves its value by delivering results around the clock.
Combine Typebot with OpenAI for smarter, more effective bots.
No trial. Generous free plan.
Choose Your Chatbot Integration Method
Widget embeds let your chatbot assist visitors anytime, even when you’re offline. For example, a potential client can visit your pricing page at night. Interact with the chatbot, qualify as a lead, and schedule a consultation without your involvement.
Think of widget embedding as installing a smart doorbell on your site. The chatbot appears as a small, unobtrusive element, ready to help visitors whenever they need it. Unlike traditional forms that feel like extra work, widget embeds start instant, two-way conversations.
Setting up a widget embed is simple. Copy a JavaScript snippet and paste it into your website’s code. The chatbot then appears automatically on every page.
New to chatbot development? Learn the fundamentals with our step-by-step guide on how to create a chatbot for beginners before diving into integration methods.
You don’t need server changes, database setup, or complex authentication. Because the widget loads asynchronously, your site speed stays fast. This is important since more than half of mobile users leave sites that load slowly.
Widget embeds adapt to context. On a product page, the chatbot can offer demos or answer feature questions. On a pricing page, it can help visitors compare plans or calculate costs. This contextual intelligence turns casual browsing into meaningful, qualified conversations.
CMS Plugins vs. Custom API Integration
Choosing between CMS plugins and custom API integration affects how natural your chatbot feels on your site.
CMS plugins are the easiest option. For example, WordPress users can install a chatbot plugin in minutes. Also, they can adjust settings through a familiar dashboard, and start engaging visitors immediately.
These plugins handle technical details like authentication, data storage, and basic analytics. This approach delivers most benefits with minimal effort.
Custom API integration suits organizations with unique needs. If your chatbot must access real-time data, check user subscriptions, or trigger complex backend workflows. This method offers unmatched flexibility. It requires developer resources but opens many possibilities.
Some platforms, like Typebot, offer both options. You can start with a simple embed for quick results and add custom integrations as your needs grow. This flexibility helps you avoid outgrowing your chatbot solution too quickly.
Curious how to implement a no-code chatbot plugin in WordPress? Explore this step-by-step guide on WordPress chatbot plugin setup to see what setup and customization look like in practice.
Decision Matrix: Matching Method to Your Needs
Your integration method affects technical setup, user experience, and business outcomes. Instead of defaulting to the most common option, match your choice to your needs.
Consider these factors:
- Technical resources: A solo consultant has different capabilities than a startup with a development team. Widget embeds require no technical skills—just copy and paste. Custom integrations need programming skills and ongoing maintenance.
- User experience requirements: An e-commerce site might need the chatbot to check inventory and connect with shipping providers. A content publisher could focus on newsletter signups and content suggestions. B2B service providers may prioritize lead qualification and meeting scheduling.
- Scalability: A chatbot handling a few hundred conversations a month has different needs than one managing thousands. Some methods scale easily, while others may hit performance or pricing limits as you grow.
- Data privacy and compliance: In Europe, organizations must ensure their integration method supports regulations like HIPAA or PCI.
This layered strategy meets different user expectations. New visitors get simple chat, while returning customers receive tailored support.
Quick Setup Checklist: Embed a Chatbot in 5 Minutes
Setting up a chatbot requires some preparation to avoid issues later.
First, confirm your website supports JavaScript embedding. This is common for most modern platforms, including simple HTML sites and complex React applications.
Most hosting providers enable this by default. If you work in a controlled corporate environment, check with your IT team to ensure external scripts can run.
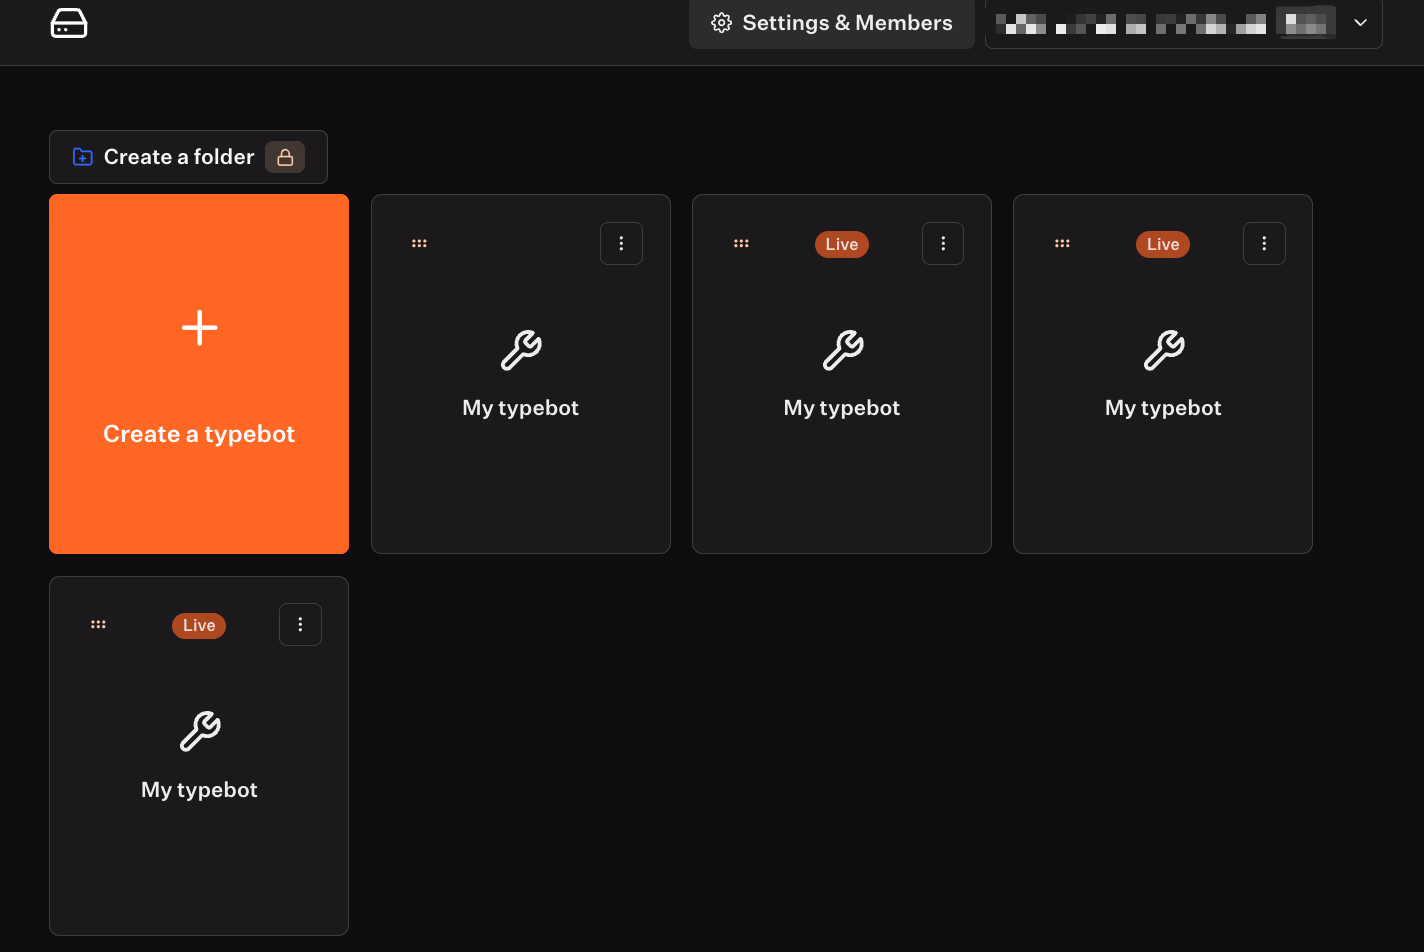
Next, visit typebot.io to create your Typebot account and build your first conversational flow.
The visual editor lets you drag and drop text bubbles for messages, input blocks to collect information, and logic blocks to guide conversations. For example, a basic lead capture bot can greet users, ask for their name, collect their email, and end with a thank-you message.
Typebot’s strength lies in its simplicity. You don’t need to train machine learning models or configure complex natural language processing. Instead, you create guided conversations that respond predictably to user choices.
Universal JavaScript Snippet Method
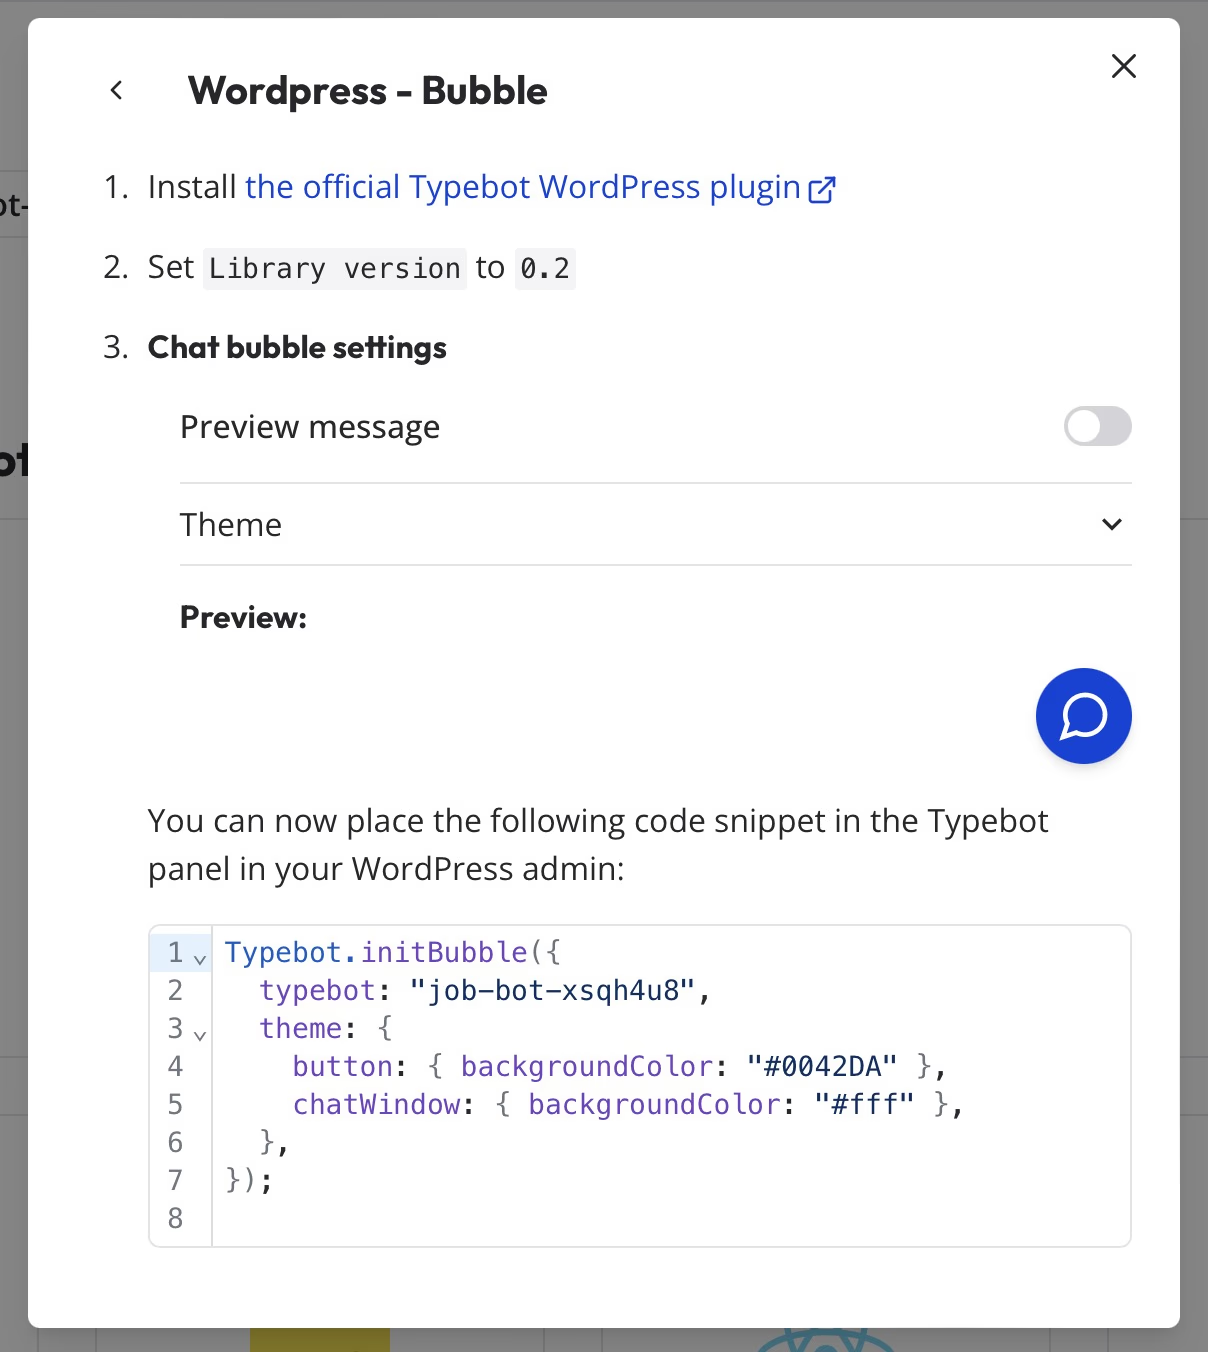
Typebot integration uses a universal JavaScript snippet that works on any platform. In your Typebot dashboard, go to the Share tab to find three embedding options designed for different user experiences:
- Standard embed: Places your chatbot directly within a webpage container, making it a permanent part of your content. This works well for support pages or product configurators where the chatbot is central.
- Popup mode: Launches your chatbot as an overlay when users take specific actions. Such as clicking a button, spending time on a page, or trying to exit. This draws attention without interrupting browsing.
- Bubble format: Adds a small chat icon to your site’s corner, allowing users to start a conversation whenever they want. It keeps your site’s design clean while offering instant support.
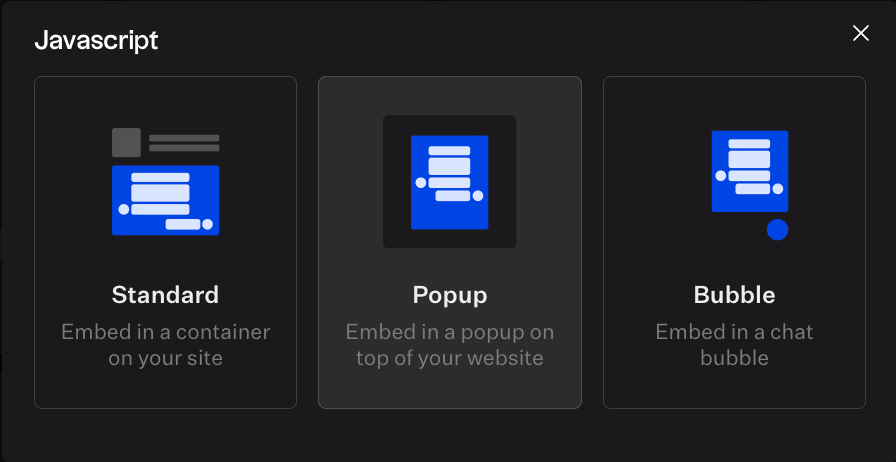
Each option generates clean, asynchronous JavaScript code, so your page loads quickly. The snippet also includes error handling and fallback features to keep your site functional. Even if Typebot’s servers experience issues.
WordPress users can streamline this process with dedicated plugins and theme integrations. Learn the specific steps for adding a chatbot to your WordPress site without touching code.
Testing Across Devices and Browsers
A chatbot that works well on your development machine might behave differently for your customers, especially on mobile devices. Embedded widgets often vary depending on screen size.
Start by testing in your main development browser, then check Chrome, Firefox, Safari, and Edge. For mobile, use real devices when possible—browser simulators can’t fully replicate touch interactions or performance.
Observe how your chatbot adapts to different screen orientations. What looks good in portrait mode might feel cramped in landscape. The bubble format usually handles orientation changes well, while standard embeds may require responsive design adjustments.
Network speed affects chatbot performance. Simulate slower connections by throttling your browser’s network speed to ensure users on 3G still experience smooth.
Accessibility is important from the start. Ensure screen readers can follow your chatbot’s flow by using proper HTML structure and ARIA labels. Keyboard navigation should be smooth, allowing users who don’t use a mouse to complete conversations easily.
Thorough testing transforms a quick setup into a quality user experience. Most issues appear during this phase, and fixing them early is easier and less disruptive than after launch.
Platform-Specific Integration Guides
Integrating a chatbot into a raw HTML website is straightforward. Without content management systems or frameworks, you control the entire process.
Copy Typebot's JavaScript snippet and paste it just before your closing </body> tag. The script loads asynchronously, so your page’s initial render time stays fast.
<script type="module">
  import Typebot from 'https://cdn.jsdelivr.net/npm/@typebot.io/js@0/dist/web.js'

  Typebot.initBubble({
    typebot: 'your-typebot-id',
  })
</script>
This method lets you place the chatbot exactly where it’s most useful. For example, you might add it in the contact section of a portfolio site or trigger it after visitors scroll past a pricing table on a product page.
You can also customize the chatbot’s appearance. With direct access to your CSS, you can override Typebot’s default styling to match your brand. This makes HTML integration ideal for developers who want precise control without framework limitations.
WordPress: Plugin Installation and Configuration
You need to get the Typebot plugin onto your WordPress site first. Go WordPress Plugin Directory.

Search Typebot from the bar.
Activate the Plugin.
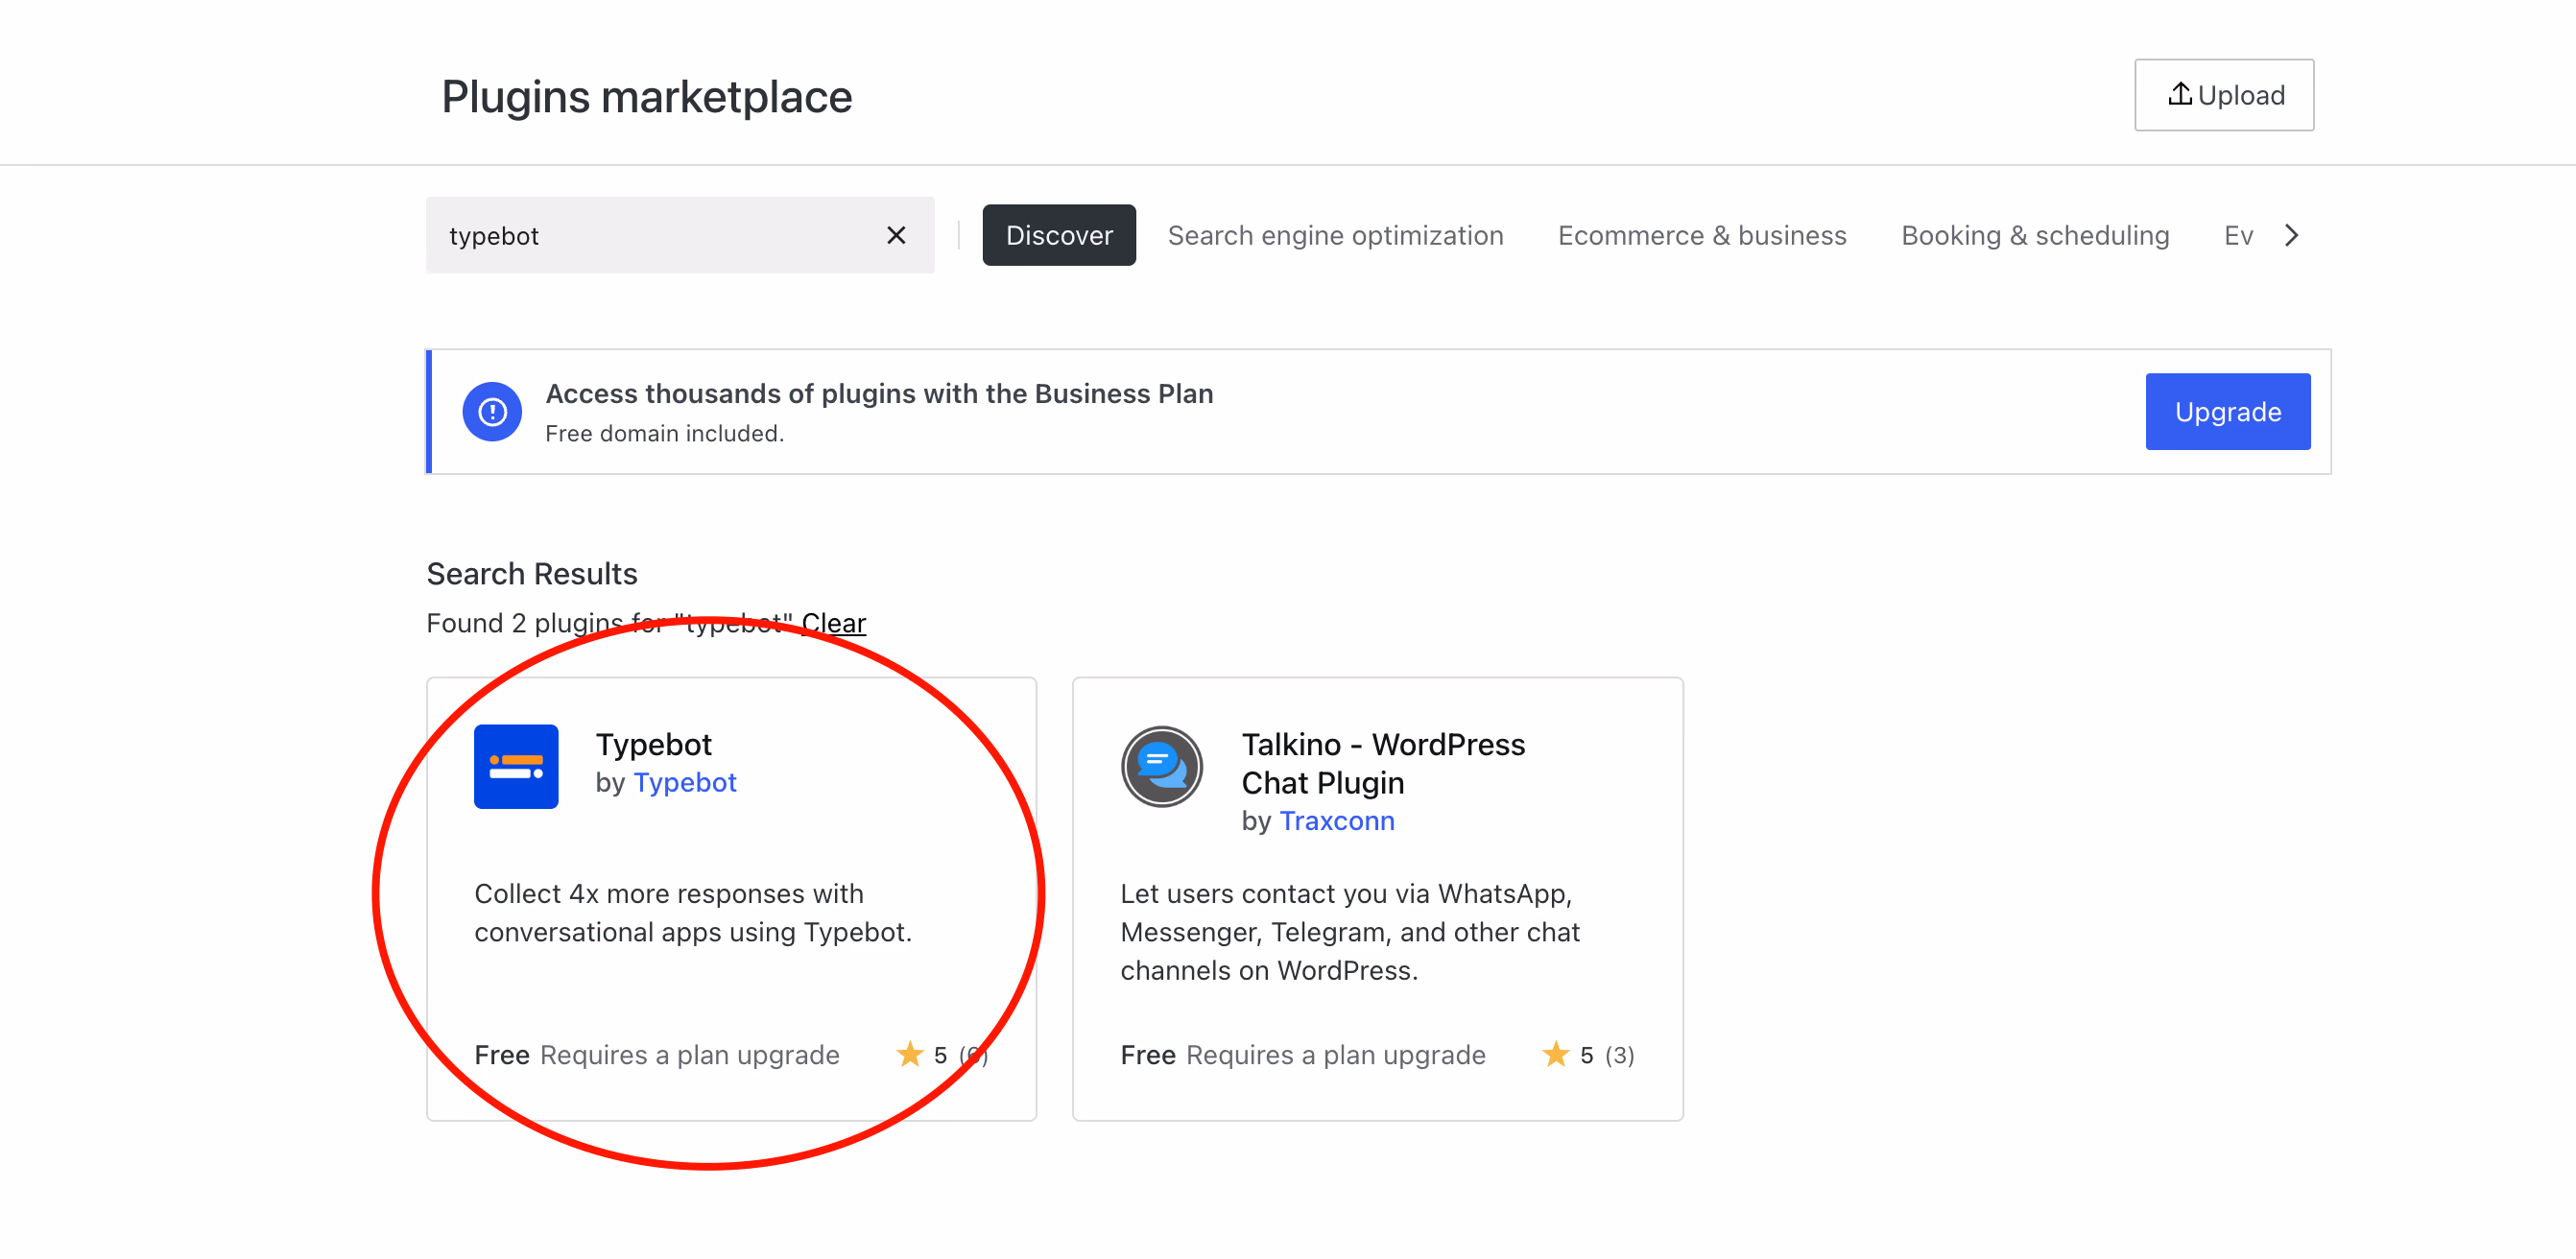
After these, you are ready for the other steps.
-
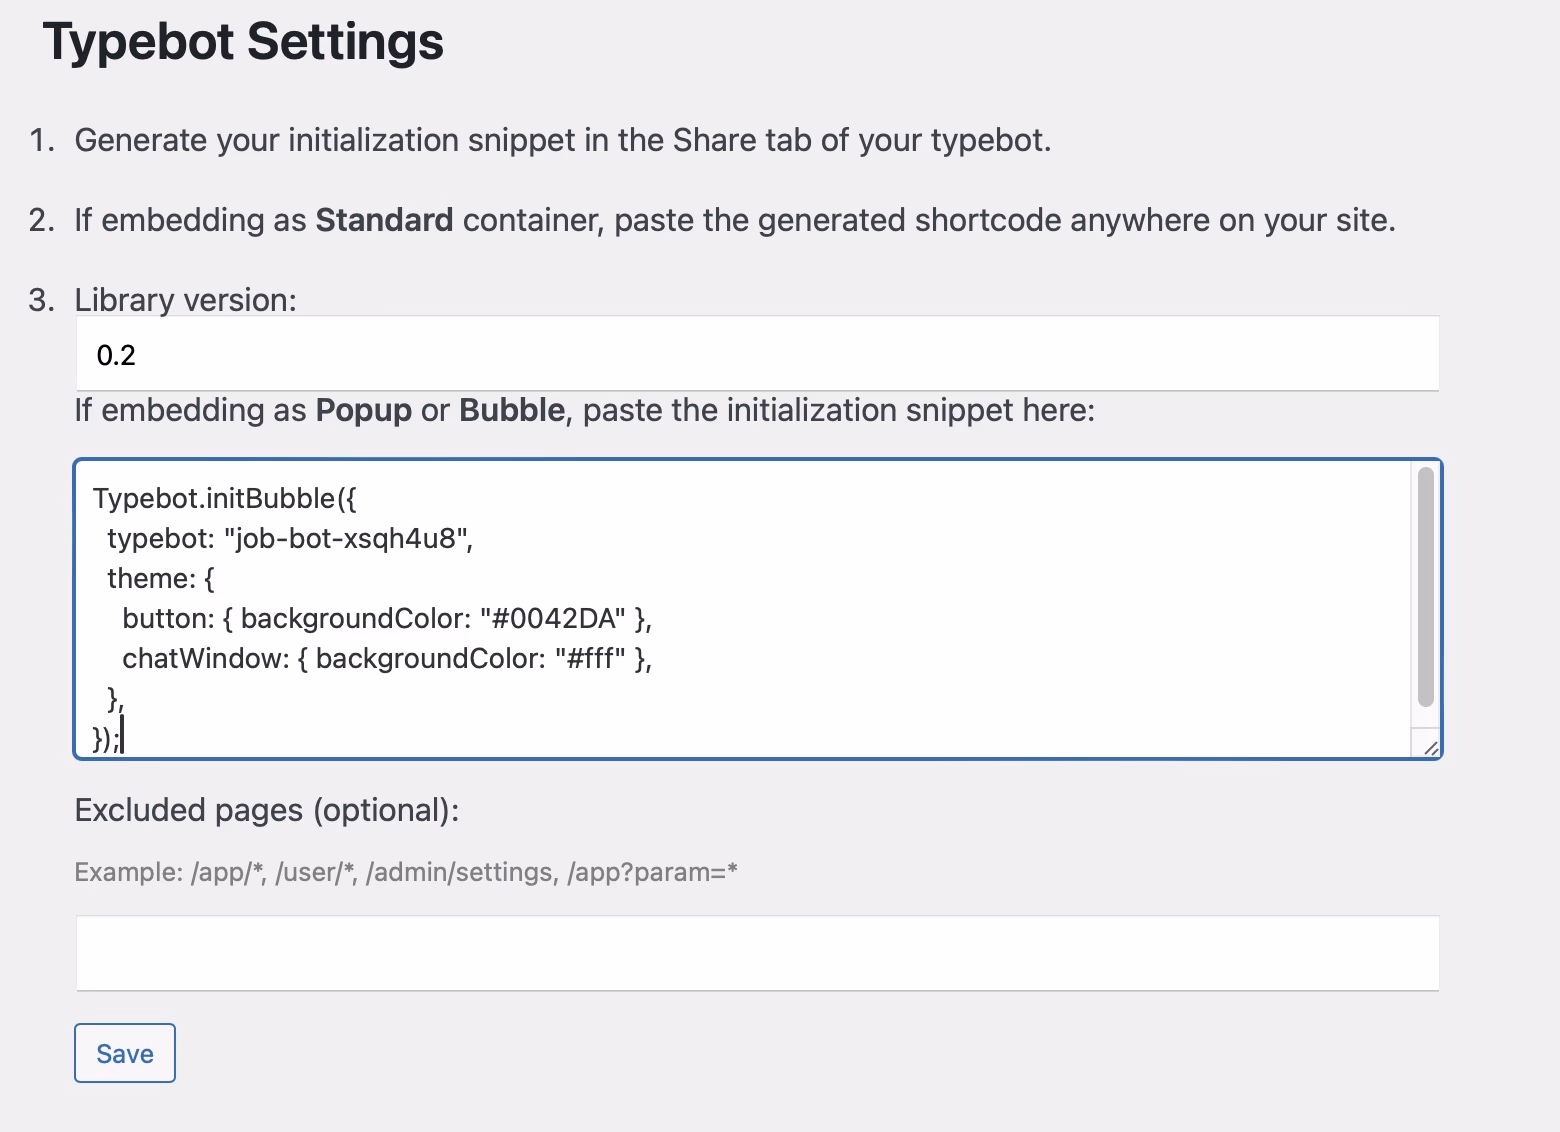
Access Typebot Settings: In the WordPress admin area, go to Settings > Typebot.
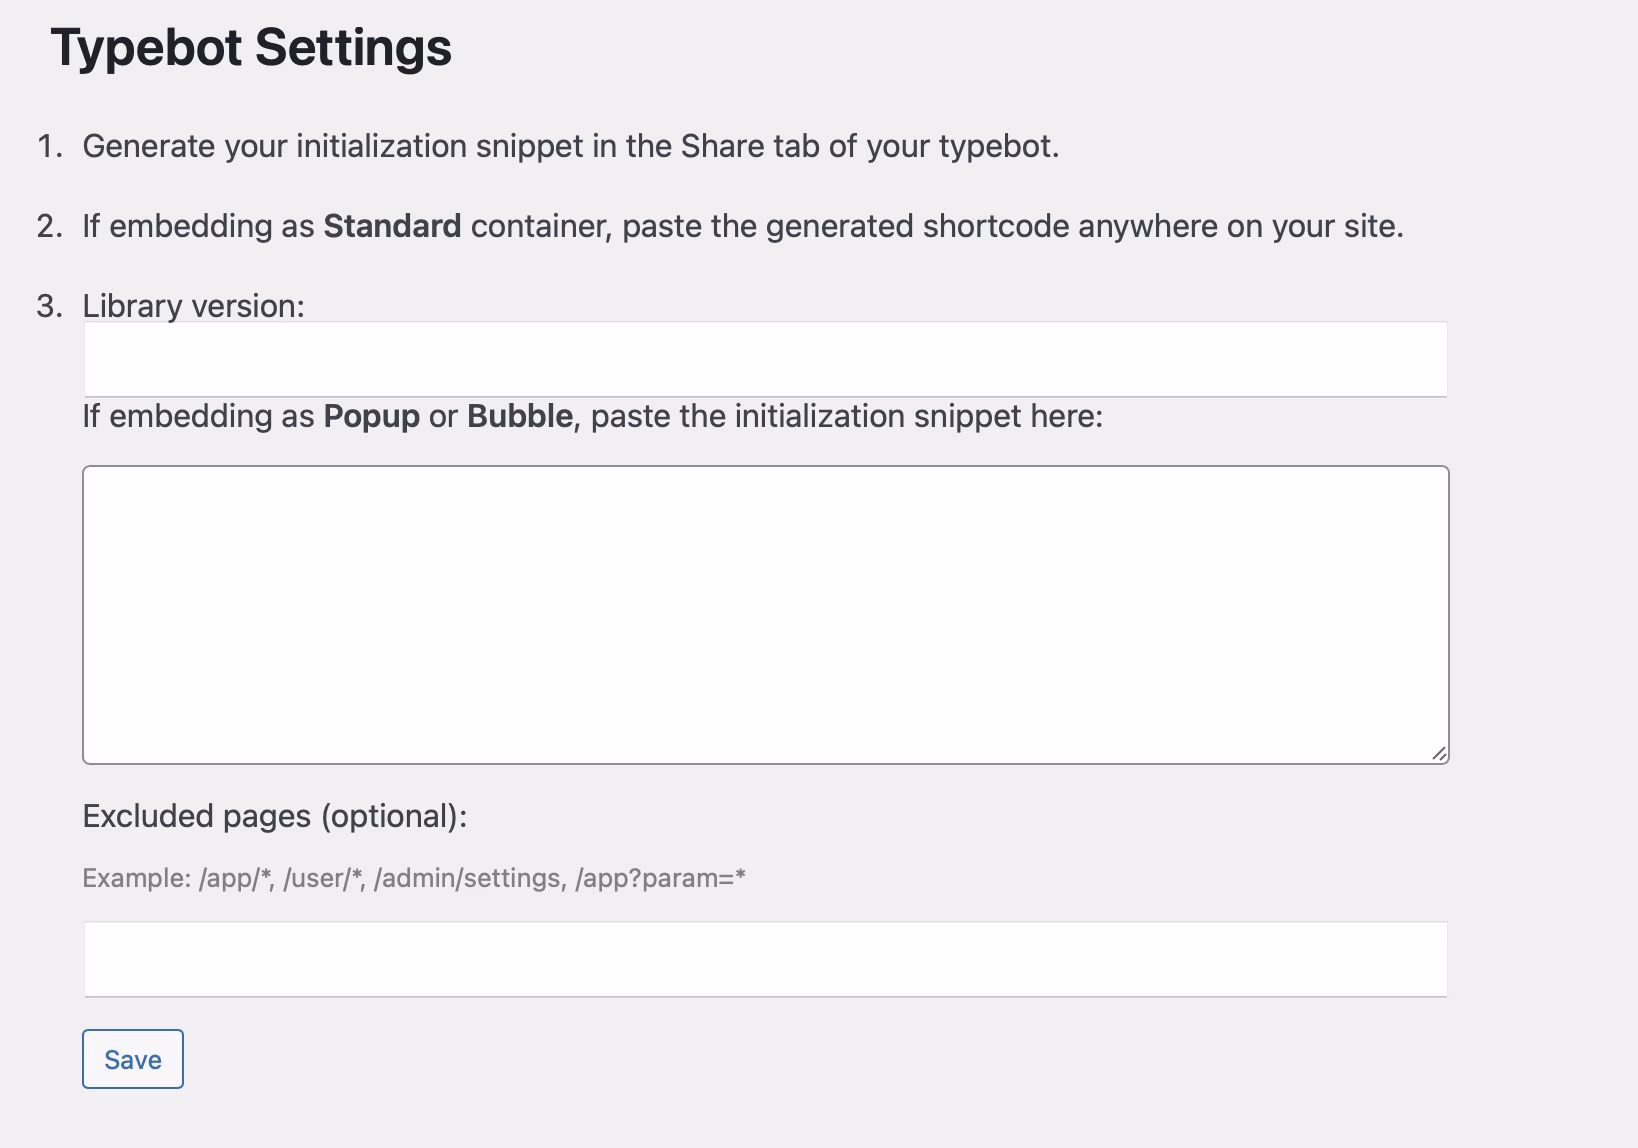
-
Log In to Your Typebot Account: Create an account. After logging in, either create a new Typebot or open an existing one.
-
Generate a Code Snippet: Click on “Share”. Select “WordPress” and click the "Get Code Snippet" button to generate your unique code.
- Paste the Code into WordPress: Copy the snippet and paste it into the “Code Snippet” field. Don’t forget to put ‘0.2’ in the Library version.
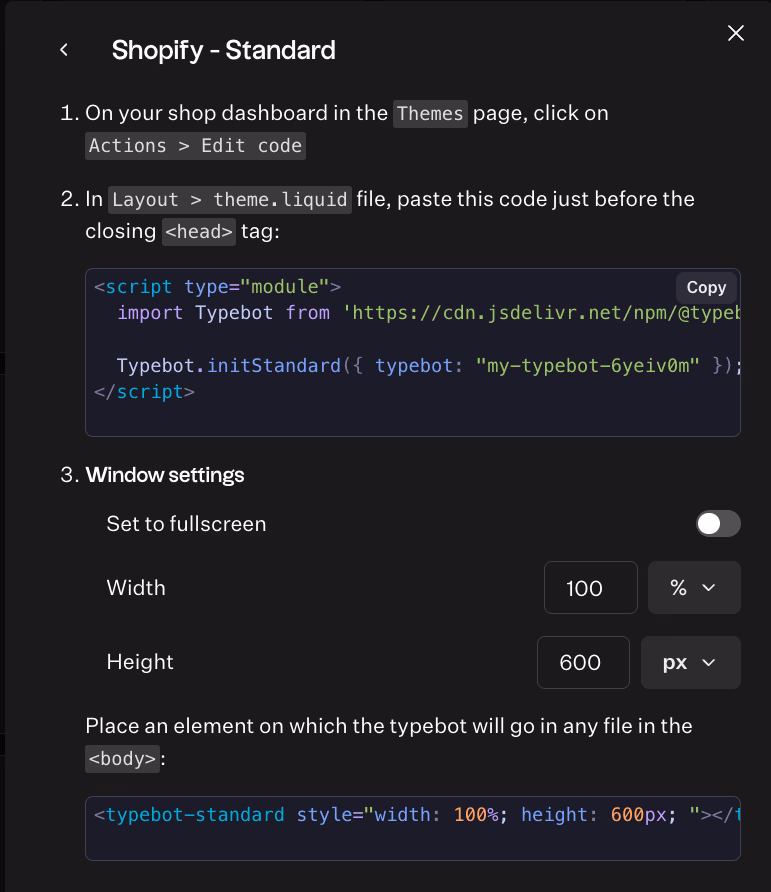
Shopify, Wix, and Webflow: Native Integrations
Popular eCommerce and website builder platforms each have their own integration workflows. These workflows focused on user experience and simplicity.
Shopify uses its theme system for chatbot integration. In your theme editor, find the theme.liquid file and add the Typebot script before the closing </body> tag. This ensures the chatbot appears on every store page.
Shopify’s checkout pages have security restrictions, so the chatbot won’t appear there by default. Use the chatbot for pre-purchase support and other methods for order-related questions.
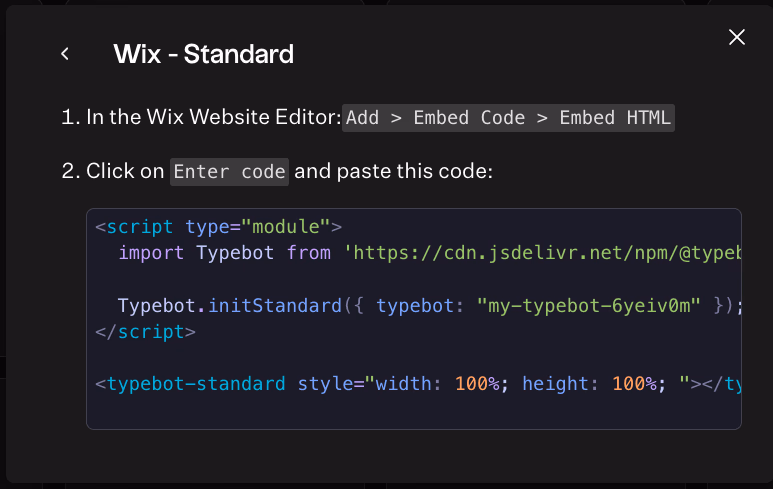
Wix integrates through its App Market and custom code features. Use the drag-and-drop editor to add an HTML embed element to your page, then paste your Typebot code inside.
Wix’s mobile editor requires separate attention. Preview your site on different devices to ensure the chatbot displays correctly. Use Wix’s responsive design tools to adjust its position and size for mobile users.
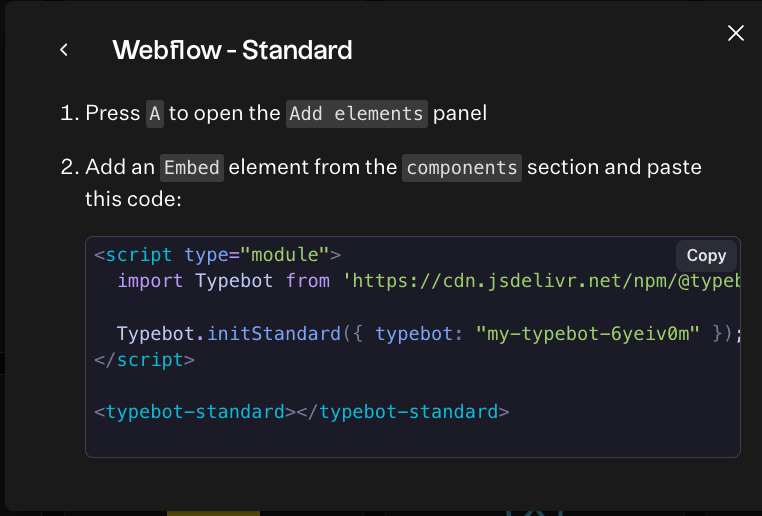
Webflow combines visual design flexibility with code access. In project settings, add your Typebot script to the footer code section for site-wide availability.
Webflow’s interaction system enables advanced triggers. You can launch the chatbot based on scroll position, button clicks, or form submissions.
React and Next.js: Component-Based Approach
Modern JavaScript frameworks like React and Next.js require a tailored integration strategy, which is why many businesses partner with a web development agency for seamless implementation.
For React, use Typebot’s npm package for seamless component lifecycle management. Install the package and import it as a React component:
import { Typebot } from '@typebot.io/react'

function App() {
  return (
    <div>
      <Typebot typebot="your-typebot-id" />
    </div>
  )
}
This method fits naturally into React’s component system. You can pass props to adjust the chatbot’s behavior, render it conditionally based on user state, or trigger it from other components.
Next.js applications need special handling for server-side rendering. To avoid hydration mismatches, initialize the chatbot only on the client side using dynamic imports with SSR disabled:
import dynamic from 'next/dynamic'

const Typebot = dynamic(
  () => import('@typebot.io/react').then((mod) => mod.Typebot),
  { ssr: false }
)
This component-based approach offers powerful integration options. You can pass user data directly to the chatbot, customize its appearance to your application’s state. Also, you can connect it with your authentication systems.
Want to make your chatbot even more intelligent and personalized? Learn how to train your chatbot on your own data to create responses that truly understand your business and customers.
Building Conversational Experiences with Typebot
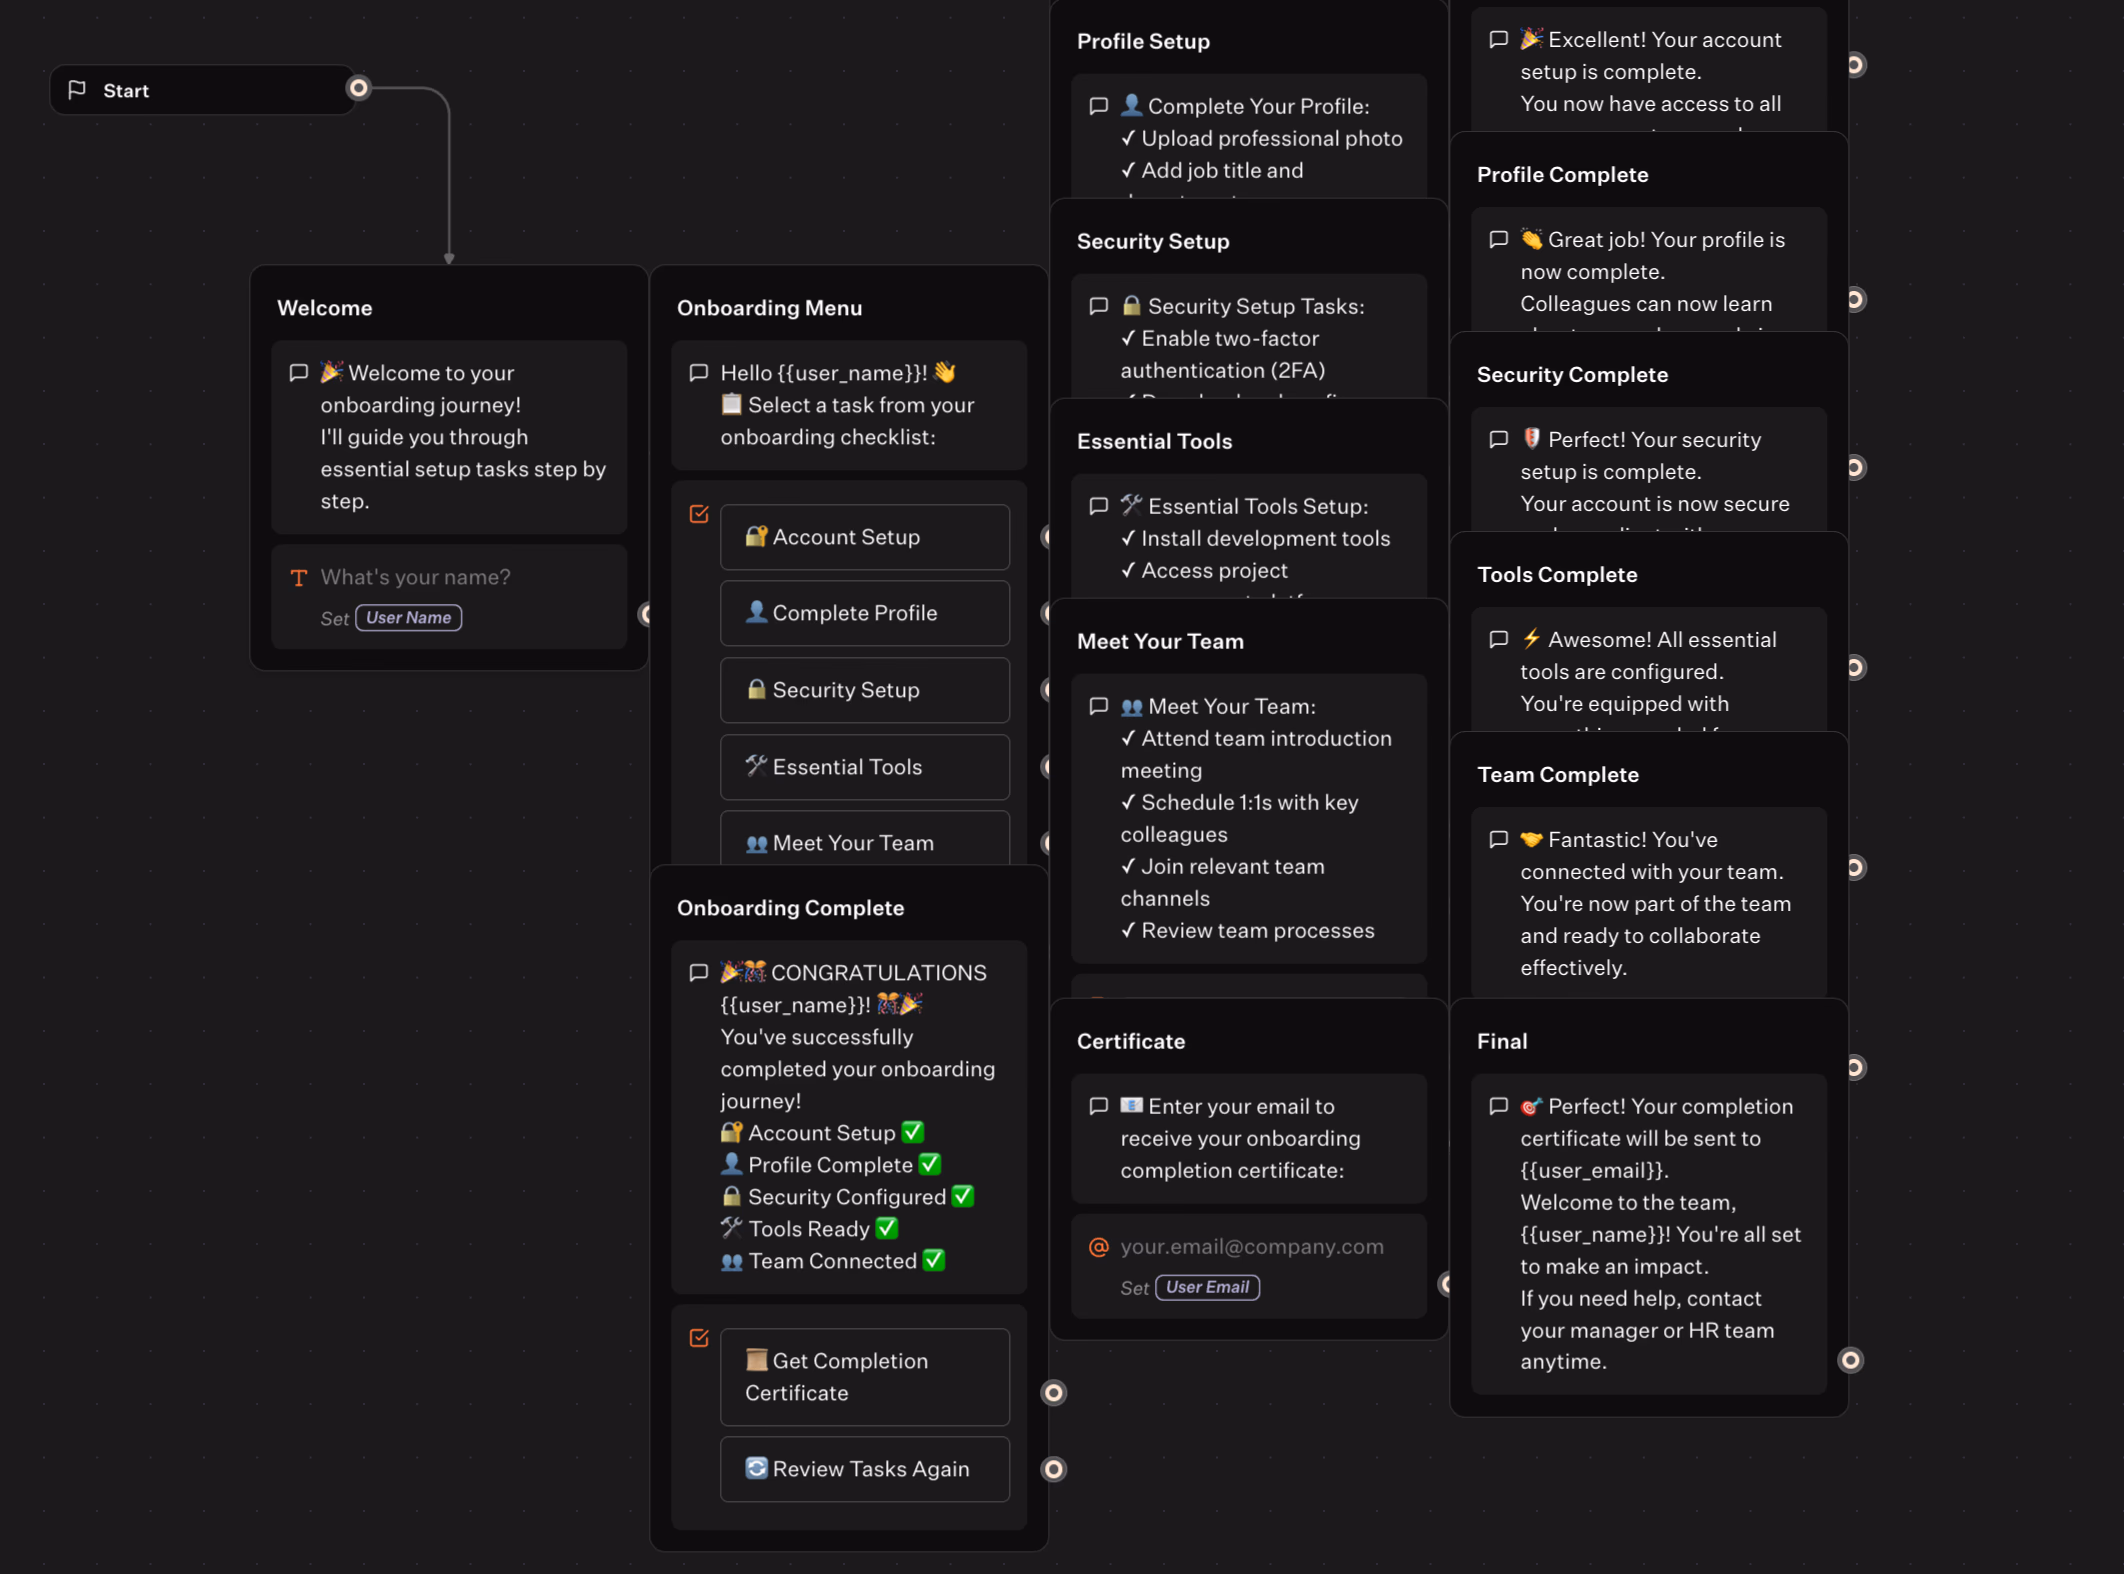
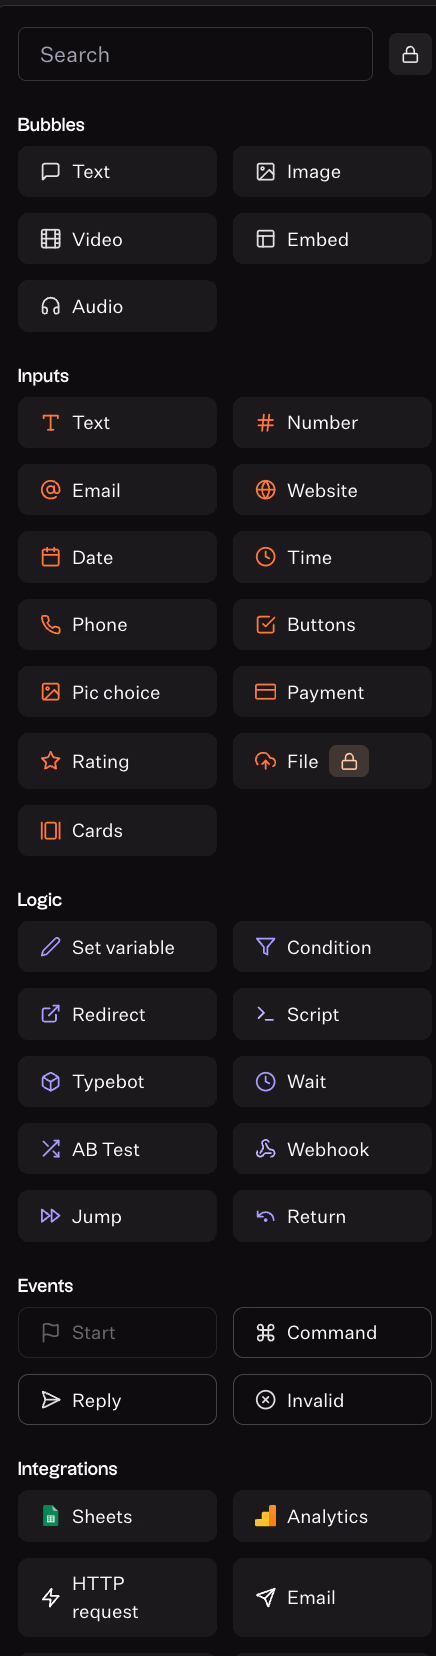
Creating a chatbot with Typebot feels more like directing a conversation than writing code. The visual editor offers a clear, flowchart-style workspace. You can easily move and connect.
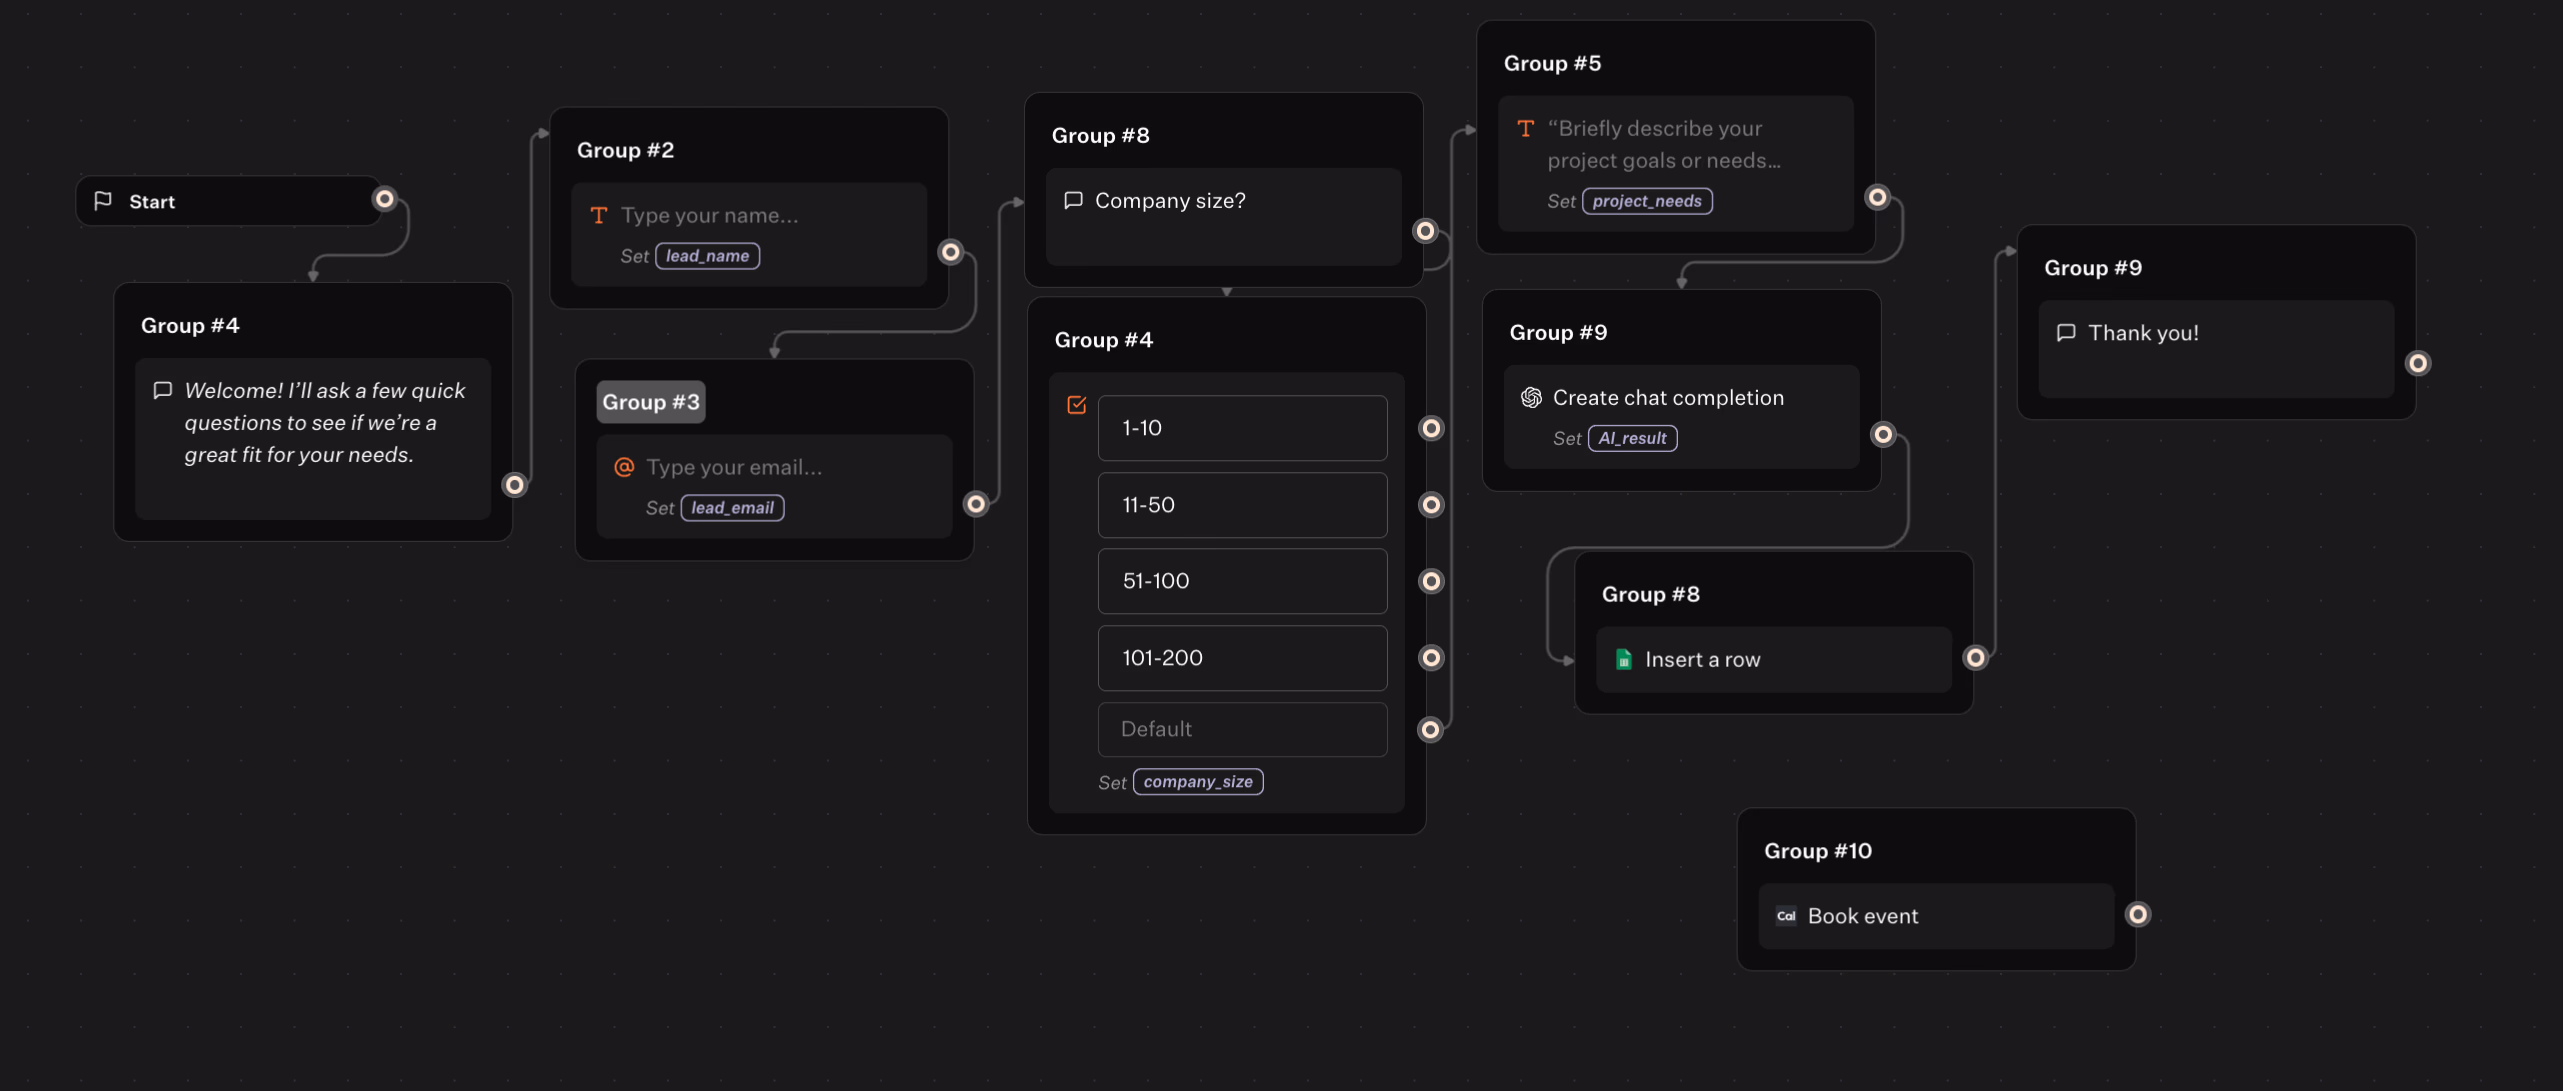
When you open the Typebot editor, you see a clean canvas and a left panel filled with conversation components. These include text bubbles for messages, input fields to gather information, and logic blocks for decision-making.
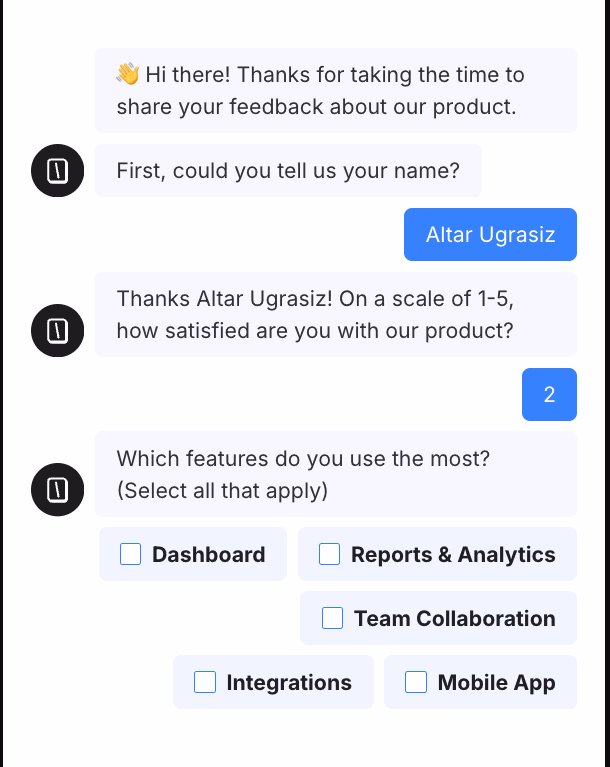
Building your first chatbot is intuitive. Drag a text bubble onto the canvas, type your greeting, and link it to an input field for user responses.
The real power shows when you connect these elements. For example, a customer service bot might start with, "How can I help you today?". Then, it can present button choices for different support topics. Each button leads to its own conversation path, branching naturally like a real dialogue.
Unlike traditional form builders, this approach guides visitors through focused questions. It shapes each interaction based on their responses. The experience feels personal and conversational, more like chatting with a helpful assistant than filling out a form.
Want to see how visual chatbot editors compare to traditional options? Explore our in-depth look at best chatbot builders of 2025 to find the right fit for your website.
Advanced Logic: Conditional Branching and Variables
Typebot’s variables act as the chatbot’s memory. They allow it to recall details shared earlier in the conversation. If a user provides their name, the bot can reference it later, offering a personalized touch or tailoring recommendations.
Consider a lead qualification scenario for a software company. The bot asks about company size and, depending on the answer, branches into different paths.
Small businesses receive starter plan details. Enterprise prospects get information about custom solutions and dedicated support. This branching uses condition blocks that automatically route conversations based on user input.
The Set variable block becomes even more powerful when paired with custom JavaScript. You can perform calculations, format data, or pull in external information.
For example, a real estate chatbot might calculate mortgage estimates using user inputs for income, down payment, and loan term. All within the conversation flow.
Conditional logic isn’t limited to simple choices. You can build complex decision trees that consider multiple variables at once.
A travel booking bot might factor in destination, budget, travel dates, and group size to recommend the best packages. Each variable shapes the conversation, ensuring users only see options relevant to them.
AI integration: connecting OpenAI and ChatGPT
Adding AI to your chatbot transforms it from a scripted assistant to an intelligent conversational partner. Typebot’s OpenAI integration lets you use ChatGPT’s language skills while keeping control over the flow and structure.
You add AI capabilities using dedicated blocks within your conversation flow. When a user asks a question beyond your predefined responses, the chatbot hands off to the AI model. The AI uses the full conversation context to generate a natural, relevant reply.
To set up AI integration, connect your OpenAI API key in the block settings. You can fine-tune the AI’s behavior by providing system prompts that define its role and tone.
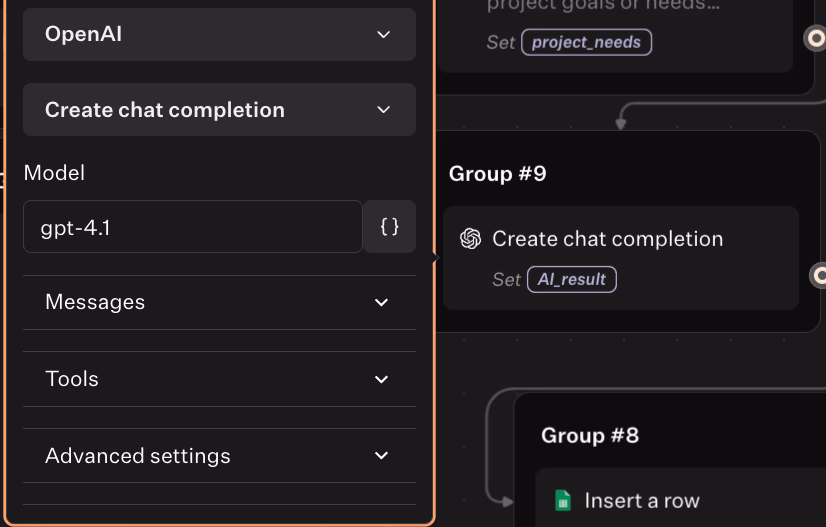
For example, a support bot might be instructed to be concise and helpful. A creative assistant could be prompted to offer detailed, imaginative responses.
The Dialogue feature maintains context across multiple AI interactions. Instead of treating each query separately, the system passes the entire conversation history to the AI. This results in more coherent and context-aware replies.
For businesses with specialized needs, you can combine AI with your own data sources. The chatbot can interpret user questions using AI, then pull specific information from your knowledge base. This delivers responses that are both smart and accurate for your business.
Curious about usage of chatbots in real life? Check out our article now!
Transform Your Website Today
Adding a chatbot to your website has never been easier thanks to Typebot's flexible integration options. You can create engaging conversational experiences that convert visitors into customers without writing a single line of code.
Eliminate the need for developers—build your bot in minutes.
No trial. Generous free plan.
Start building your first chatbot today and watch your website transform from a static brochure into an 24/7 interactive hub!