
Want to capture leads without disrupting your website's sleek design? The Webflow popup contact form can boost engagement. It combines Webflow's elegant design capabilities with a functional lead generation system.
This guide shows you how to create an eye-catching popup form. It will grab attention and integrate seamlessly with your Webflow site.
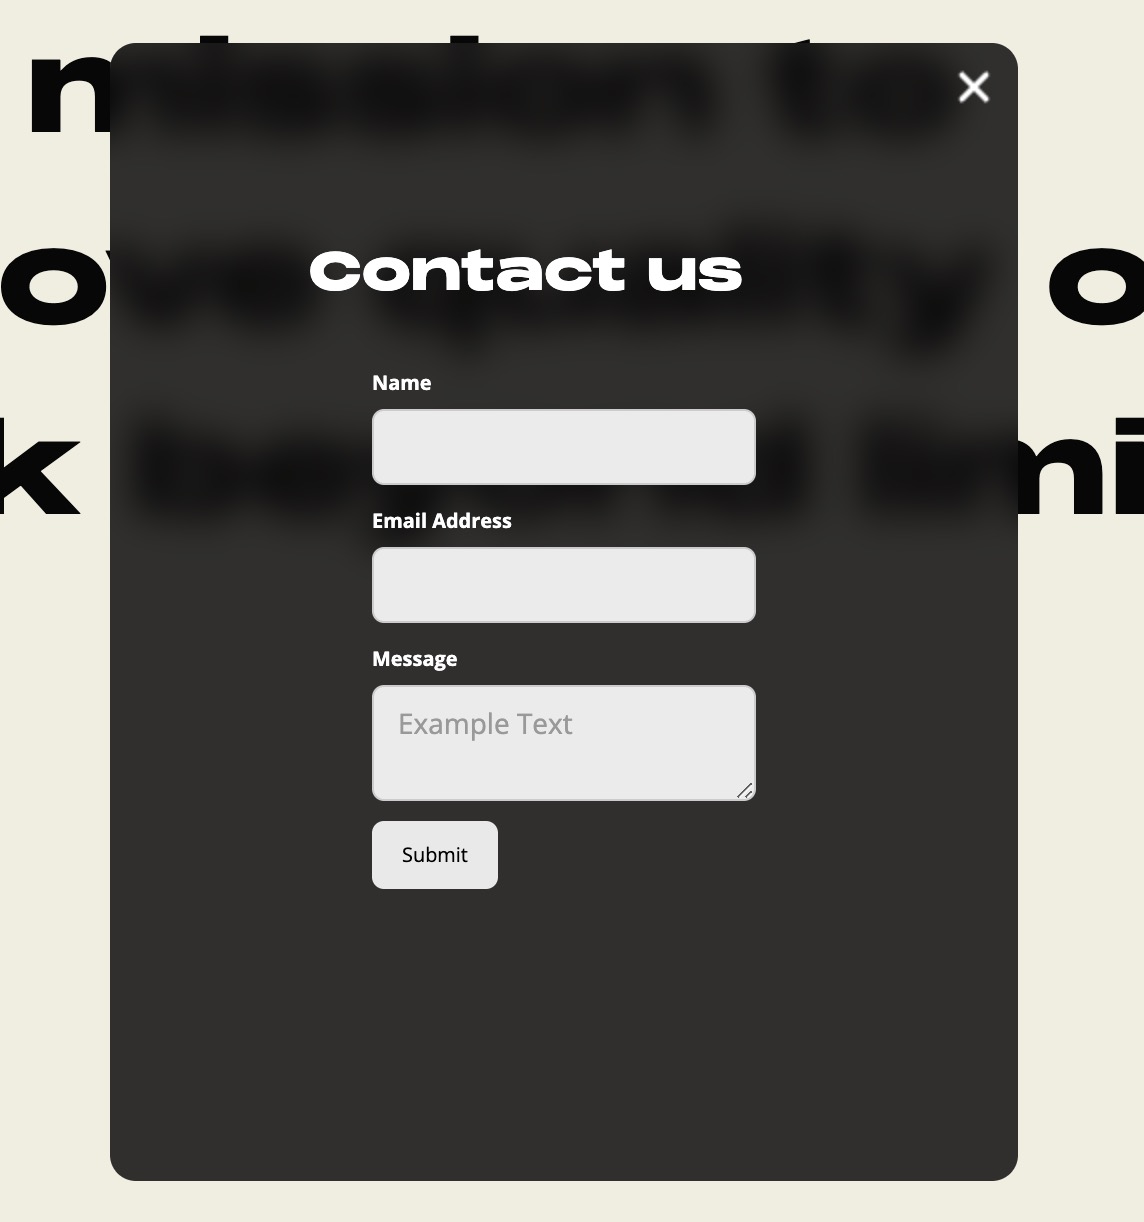
Here is what we are going to build:
Setting Up the Popup Form Structure
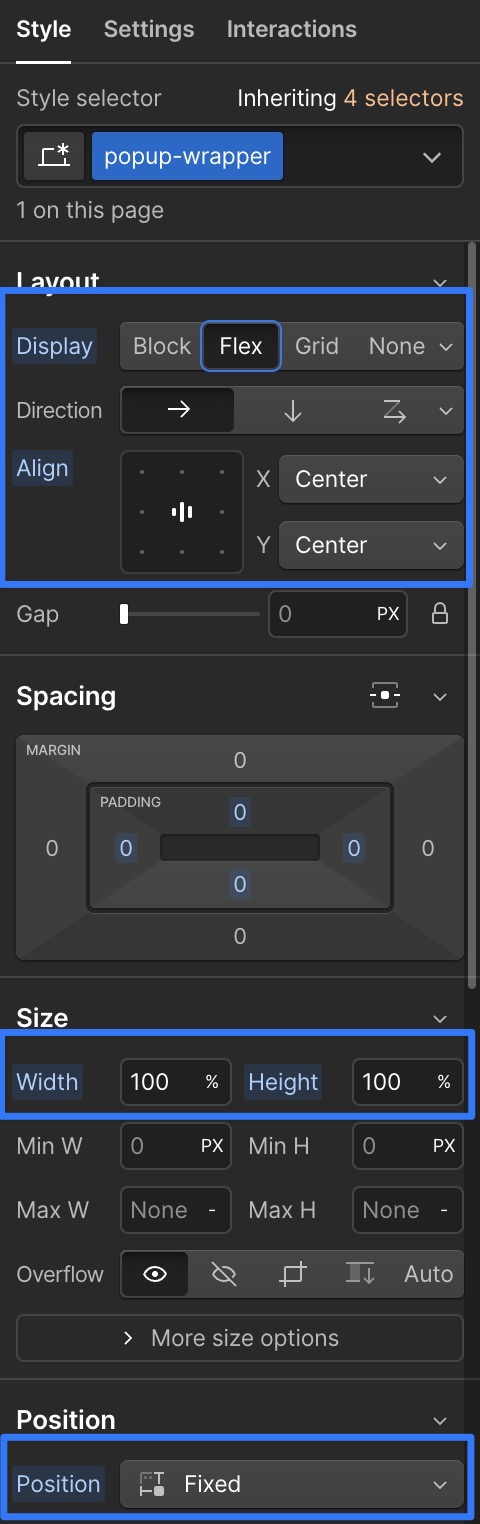
First, create a new div element on your page. Think of this as the canvas for your popup. Give it a descriptive class name like "popup-wrapper". This wrapper serves as the outermost layer, controlling the popup's overall behavior and appearance.
Now, let's bring this wrapper to life. Imagine it as a translucent curtain that covers your screen. Set its width and height to 100% to ensure it spans the full dimensions of the viewer's browser window.
Next, position it as 'fixed'. This keeps your popup in place, even if the user scrolls the main page.
With the basics in place, add some flair. Set the display to 'flex' and align your content both vertically and horizontally to the center. This creates a balanced look for your popup. Initially set the display to 'none'. This keeps your popup hidden until it's called upon.
Inside this wrapper, create two more elements:
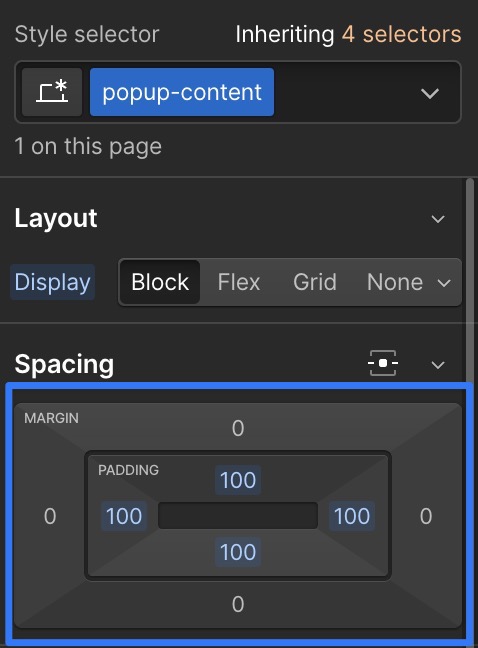
- Add another div for your popup content. This will house all the visual elements of your form.
- Nest a Form element within this content div. This is where user interaction happens.
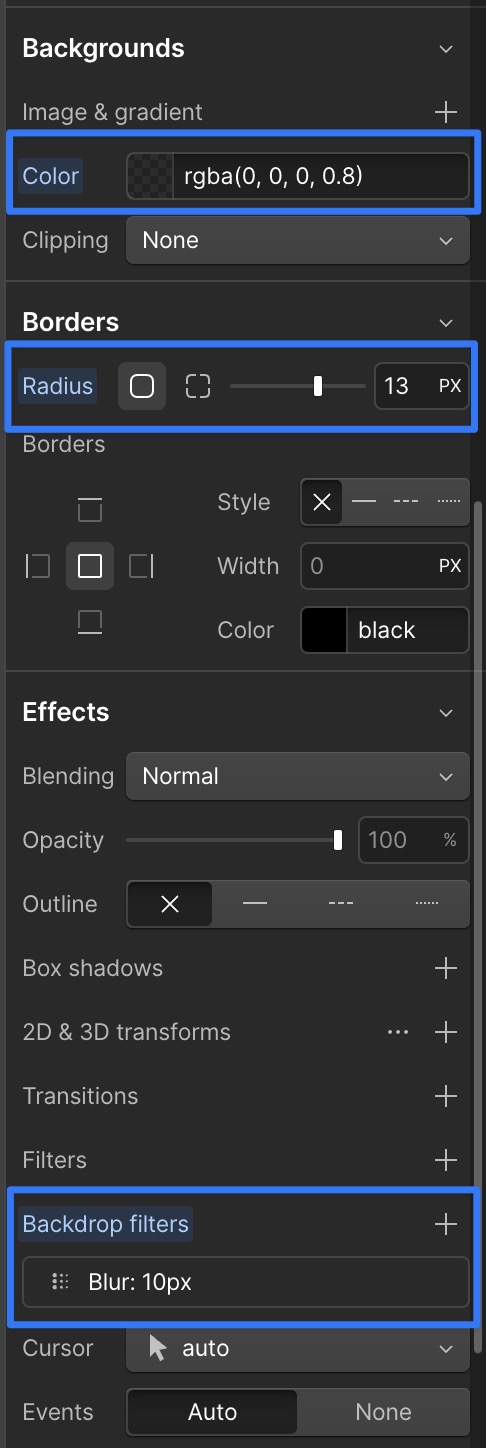
Now, let's style it. Give your popup content a semi-transparent background. A black overlay with 80% opacity works well, focusing attention on your form while showcasing your website beneath. Add a backdrop blur for an extra touch of modernity. A 10px blur creates a frosted glass effect, adding depth to your design.
Don't forget the finishing touches:
-
Add padding to give your content breathing room.
-
Use a border radius to soften the edges, making your popup feel more inviting and less intrusive.
These small details significantly impact how users perceive and interact with your form. By meticulously crafting this structure, you're not just building a form; you're creating an experience. With this solid foundation, you're ready to design the form elements themselves.
Designing the Contact Form Elements
With your popup structure ready, it's time to breathe life into your contact form. The elements you choose and how you style them will determine the form's effectiveness and engagement level.
Essential Input Fields
Start with the essentials:
- Name field: Personalizes the interaction.
- Email address field: Crucial for future communications.
- Message textarea: Allows visitors to express detailed thoughts or questions.
Implementing a Close Button
A well-designed close button is crucial for your Webflow popup contact form. It enhances the user experience and respects their autonomy. Let’s create a close button that's both functional and aesthetically pleasing.
Visual Aspect
A simple 'X' can work, but consider using an elegant icon to match your site's design language. Browse Lucide for various close icons that can complement your form's style. Once you've selected an icon, download it as a PNG and integrate it into your design.
Positioning the Button
Place the close button in the top-right corner, where users instinctively look for exit options. In Webflow, set the button's position to 'absolute' within your popup content div. This allows precise control over its location, regardless of the form's content.
Fine-tune the placement by setting both the 'top' and 'right' values to 10 pixels. This gives a comfortable margin from the edges, making the button visible but not intrusive.
Chatbots can be an effective alternative or complement to traditional contact forms for lead generation. For more information on creating a lead generation chatbot, check out our comprehensive guide.
Configuring Interactions for the Popup
Bringing your Webflow popup contact form to life is crucial for enhancing user engagement. The way your form appears and disappears can significantly impact its effectiveness. Let's set up these critical interactions to make your popup both functional and delightful.
Trigger Element
First, you need a trigger element on your main page. This could be a button, text link, or image. Make it noticeable and inviting, like a "Contact Us" button in your header or a "Get in Touch" link in your footer.
Setting Up the Interaction
In Webflow's Interactions panel, create a new interaction for your trigger. Set it to respond "On Click." This ensures the popup only appears when the user actively chooses to engage.
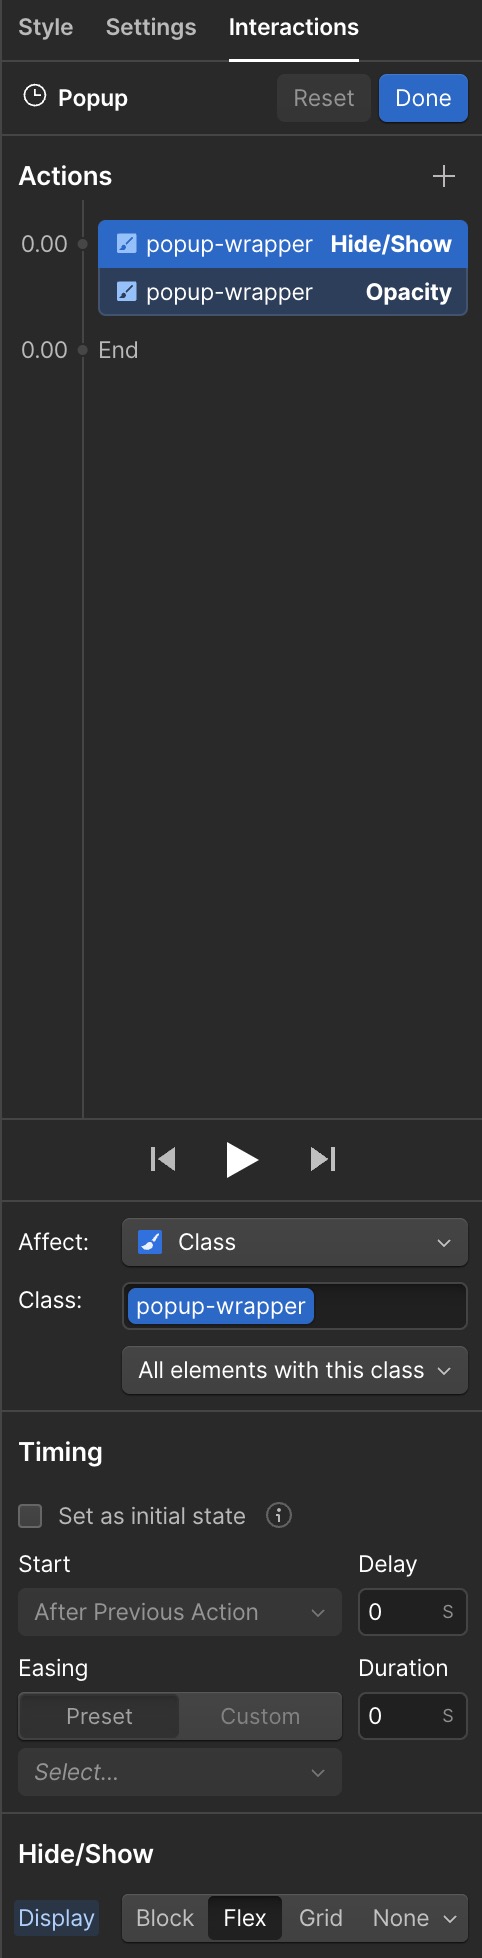
Animate your popup wrapper from invisible to visible. Select your popup wrapper as the target. Then set its initial display property to "Flex." This primes the popup for appearance.
Animation Details
Next, animate the opacity from 0% to 100% for a smooth fade-in effect. Consider adding a slight scale animation, perhaps from 95% to 100%. This creates the illusion of the popup gently expanding into view.
A duration of 300 to 400 milliseconds usually works well. Experiment with easing functions; an "Ease Out" function can give your popup a smooth settling effect.
Closing Animation
Create a new interaction for the close button, triggered "On Click." For the closing animation, reverse the opening steps. Animate the opacity from 100% back to 0%. Mirror any scale animation used for opening, perhaps from 100% to 95%.
Set the display property of your popup wrapper back to "None" at the end of the closing animation. This ensures it completely disappears and doesn't interfere with other page elements.
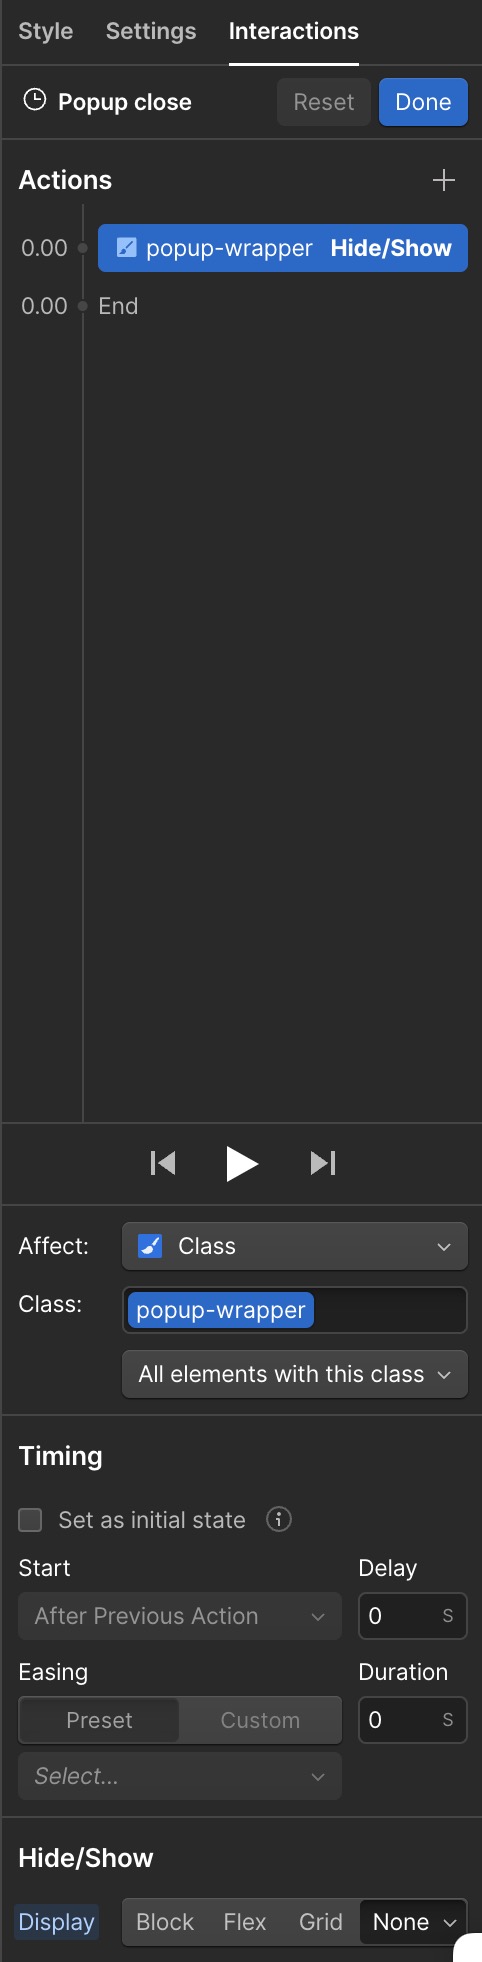
Consider adding a slight delay before the popup becomes invisible. This allows the fade-out animation to complete before the element is removed from the layout.
Additional Touches
For extra interactivity, add subtle animations to your form elements. Have them fade in slightly after the main popup appears, creating a cascading effect. This can naturally draw attention through your form.
Testing
Test your interactions thoroughly. Check how they look and feel at different screen sizes. Ensure smooth animations on mobile devices without causing layout shifts or performance issues.

Configuring Form Submissions and Email Notifications
Now that your Webflow popup contact form looks great and functions smoothly, it's time to ensure the submitted information reaches you effectively. This crucial step transforms your form into a powerful communication tool.
Let's set up form submissions and configure email notifications using Webflow's Logic feature.
Step 1: Add the Email Address as a Webflow Project Editor
To enable a specific email address to receive form notifications, add it as a Webflow project editor:
- Navigate to the project settings
- Add the email address in the authorized editors section (Members > Site Access or Content Editors)
Note: Depending on your Webflow plan, you can add 3 or 10 editors.
Step 2: Create a New "Flow" in the Logic Area
Logic is now available to all Webflow users. To set up your form automation:
- Access the "Logic" area in the Webflow Designer (located below the CMS icon or use keyboard shortcut "L")
- Click "New Flow" to begin configuring the automation
- Provide a precise name and description for your "flow" to facilitate easy reference
Step 3: Choose a "Form Submission" Trigger
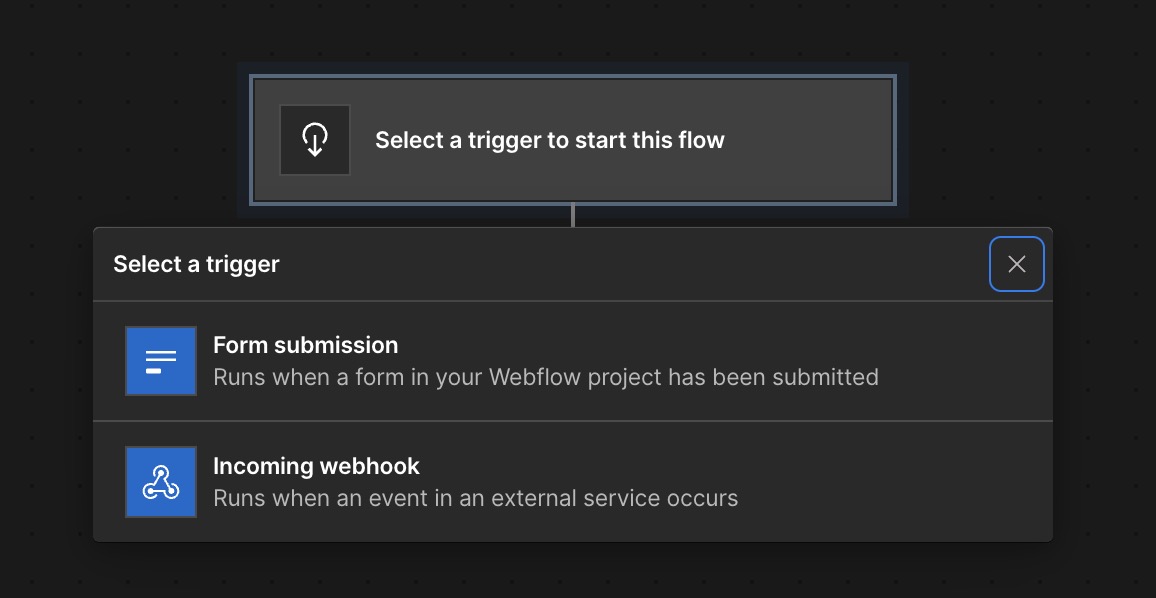
- Select a "Form Submission" trigger in Logic 2. Choose the specific form you want to automate from the "Form" selection field 3. Assign a clear name to the action in the "Trigger Name" field
Step 4: Add a "Send Email Notification" Action
- Drag and drop the "Send Email Notification" action below your trigger
- In "Settings," select the receiver from project members
- Customize the email subject and message, incorporating form field variables as needed (using the small purple dot)
Step 5: Publish the Flow and Project
- Publish your flow to activate the email notification process
- Publish your Webflow project to make your form and automation flow live

By following these steps, you'll successfully configure your Webflow popup contact form to send submissions to a specific email address using Webflow's native automation tool, Logic.
Alternative Contact Methods
While a Webflow popup contact form is powerful, offering alternative contact methods caters to different user preferences. Integrating a calendar booking system and adding a chatbot can create a comprehensive communication strategy.
Calendar Booking System
Integrate a calendar booking system like Calendly to streamline scheduling meetings or consultations. This is especially useful for appointment-based businesses or busy teams. You can embed a Calendly widget in your popup or create a separate button linking to the scheduling interface.
When setting up your Calendly integration, offer multiple meeting durations or types. Options like a 15-minute intro call, a 30-minute consultation, or a full hour-long meeting provide flexibility for users to choose the level of engagement that suits their needs and your availability.
Adding a Chatbot
A chatbot offers instant communication for users who prefer immediate responses. Integrate third-party chatbot services like Typebot with a simple embed code in Webflow.
Configure your chatbot with a warm welcome message that aligns with your brand voice. Set up quick reply buttons for common queries, like "Product Information," "Pricing," or "Speak to a Human," to guide the conversation effectively.
No trial. Generous free plan.
Chatbot Configuration
Program your chatbot to handle basic queries automatically while offering an easy way to escalate to human support for complex issues. This ensures quick responses and personalized assistance.
Creating a stunning Webflow popup contact form is just the beginning. Implementing a well-designed form, configuring smooth interactions, and offering alternative contact methods set the stage for engaging conversations and potential conversions.
No trial. Generous free plan.