
To enhance user engagement in your React application, adding a chatbot can be a game changer. You don't need to get overwhelmed by complex code. React chatbots offer interactive and responsive interfaces.
Building a React chatbot isn't as hard as it seems. This article explores three methods to build your own chatbot. We'll cover no-code solutions to full-stack implementations. Whether you're an experienced developer or new to React, you'll find an approach that fits your skill level and project needs. Ready to improve your user experience with a custom React chatbot? Let's dive in.
What is a React Chatbot?
Definition of a React Chatbot
A React chatbot is an interactive component in a React application. It simulates human-like conversations with users, enhancing engagement and delivering information efficiently.
How Chatbots Work Within React Applications
React chatbots use React's component-based architecture to create modular and reusable chat interfaces. They usually include:
- A chat window component
- Message display components
- Input field for user messages
- State management for conversation flow
- API integration for processing messages and generating responses
The chatbot's logic involves conditional rendering, hooks for state management, and asynchronous functions for API calls.
Benefits of Integrating a Chatbot in Your React App
- 24/7 availability for user inquiries
- Reduced customer support workload
- Personalized user experiences
- Streamlined information gathering
- Improved user engagement and retention
Overview of Typebot as a No-Code Chatbot Builder
Typebot is an open-source platform that makes it easy to create chatbots for React applications. Its key features include:
- Drag-and-drop interface for bot design
- Visual flow builder for conversation logic
- Pre-built components like text bubbles, input fields, and buttons
- Easy integration with React via API or embed code
- Customizable themes to match your app's design
New to chatbot building? Check out our comprehensive beginner's guide on how to create a chatbot with step-by-step tutorials and examples.
Real-World Use Cases of React Chatbots
| Industry | Use Case | Example |
|---|---|---|
| E-commerce | Product recommendations | Suggesting items based on browsing history |
| Healthcare | Symptom checker | Guiding users through initial health assessments |
| Finance | Account management | Helping users check balances and make transfers |
| Education | Course enrollment | Assisting students in selecting and registering for classes |
| Travel | Booking assistance | Helping users find and book flights or accommodations |
React chatbots are versatile tools. They can significantly enhance user experience across various domains, providing immediate assistance and personalized interactions.
Method 1: Creating a Simple React Chatbot Using Typebot
Setting Up Typebot Account
- Visit typebot.io and sign up for an account.
- Verify your email address.
- Log in to the Typebot dashboard.
Designing Your Chatbot using Typebot's Drag-and-Drop Interface
- Click "Create a new typebot".
- Choose a template or start from scratch.
- Add blocks to your flow:
- Text bubbles for bot messages.
- Input fields for user responses.
- Buttons for multiple-choice options.
- Connect blocks to create conversation logic.
- Use conditional statements to branch conversations.
Looking for inspiration to create your first chatbot? We gathered some chatbot script exampes to help you get started.
Exporting and Integrating Typebot Code in React
- In Typebot, go to "Share" > "Web".
- Choose the "React" embed option.
- Copy the provided code snippet.
- In your React project, install Typebot libraries:
npm install @typebot.io/react- Create a new component in your React app:
import { Bubble } from "@typebot.io/react";

const ChatbotComponent = () => {
  return <Bubble typebot="YOUR_TYPEBOT_ID" />;
};

export default ChatbotComponent;
Adding Typebot Chatbot to Existing React Applications
- Import the ChatbotComponent where needed:
import ChatbotComponent from "./ChatbotComponent";

function App() {
  return (
    <div className="App">
      <h1>My React App</h1>
      <ChatbotComponent />
    </div>
  );
}- Customize the chatbot's appearance:
<Bubble
typebot="your-typebot-id"
theme={{ button: { backgroundColor: "#0042DA" } }}
prefilledVariables={{
"User Name": "John Doe",
"Page URL": window.location.href,
}}
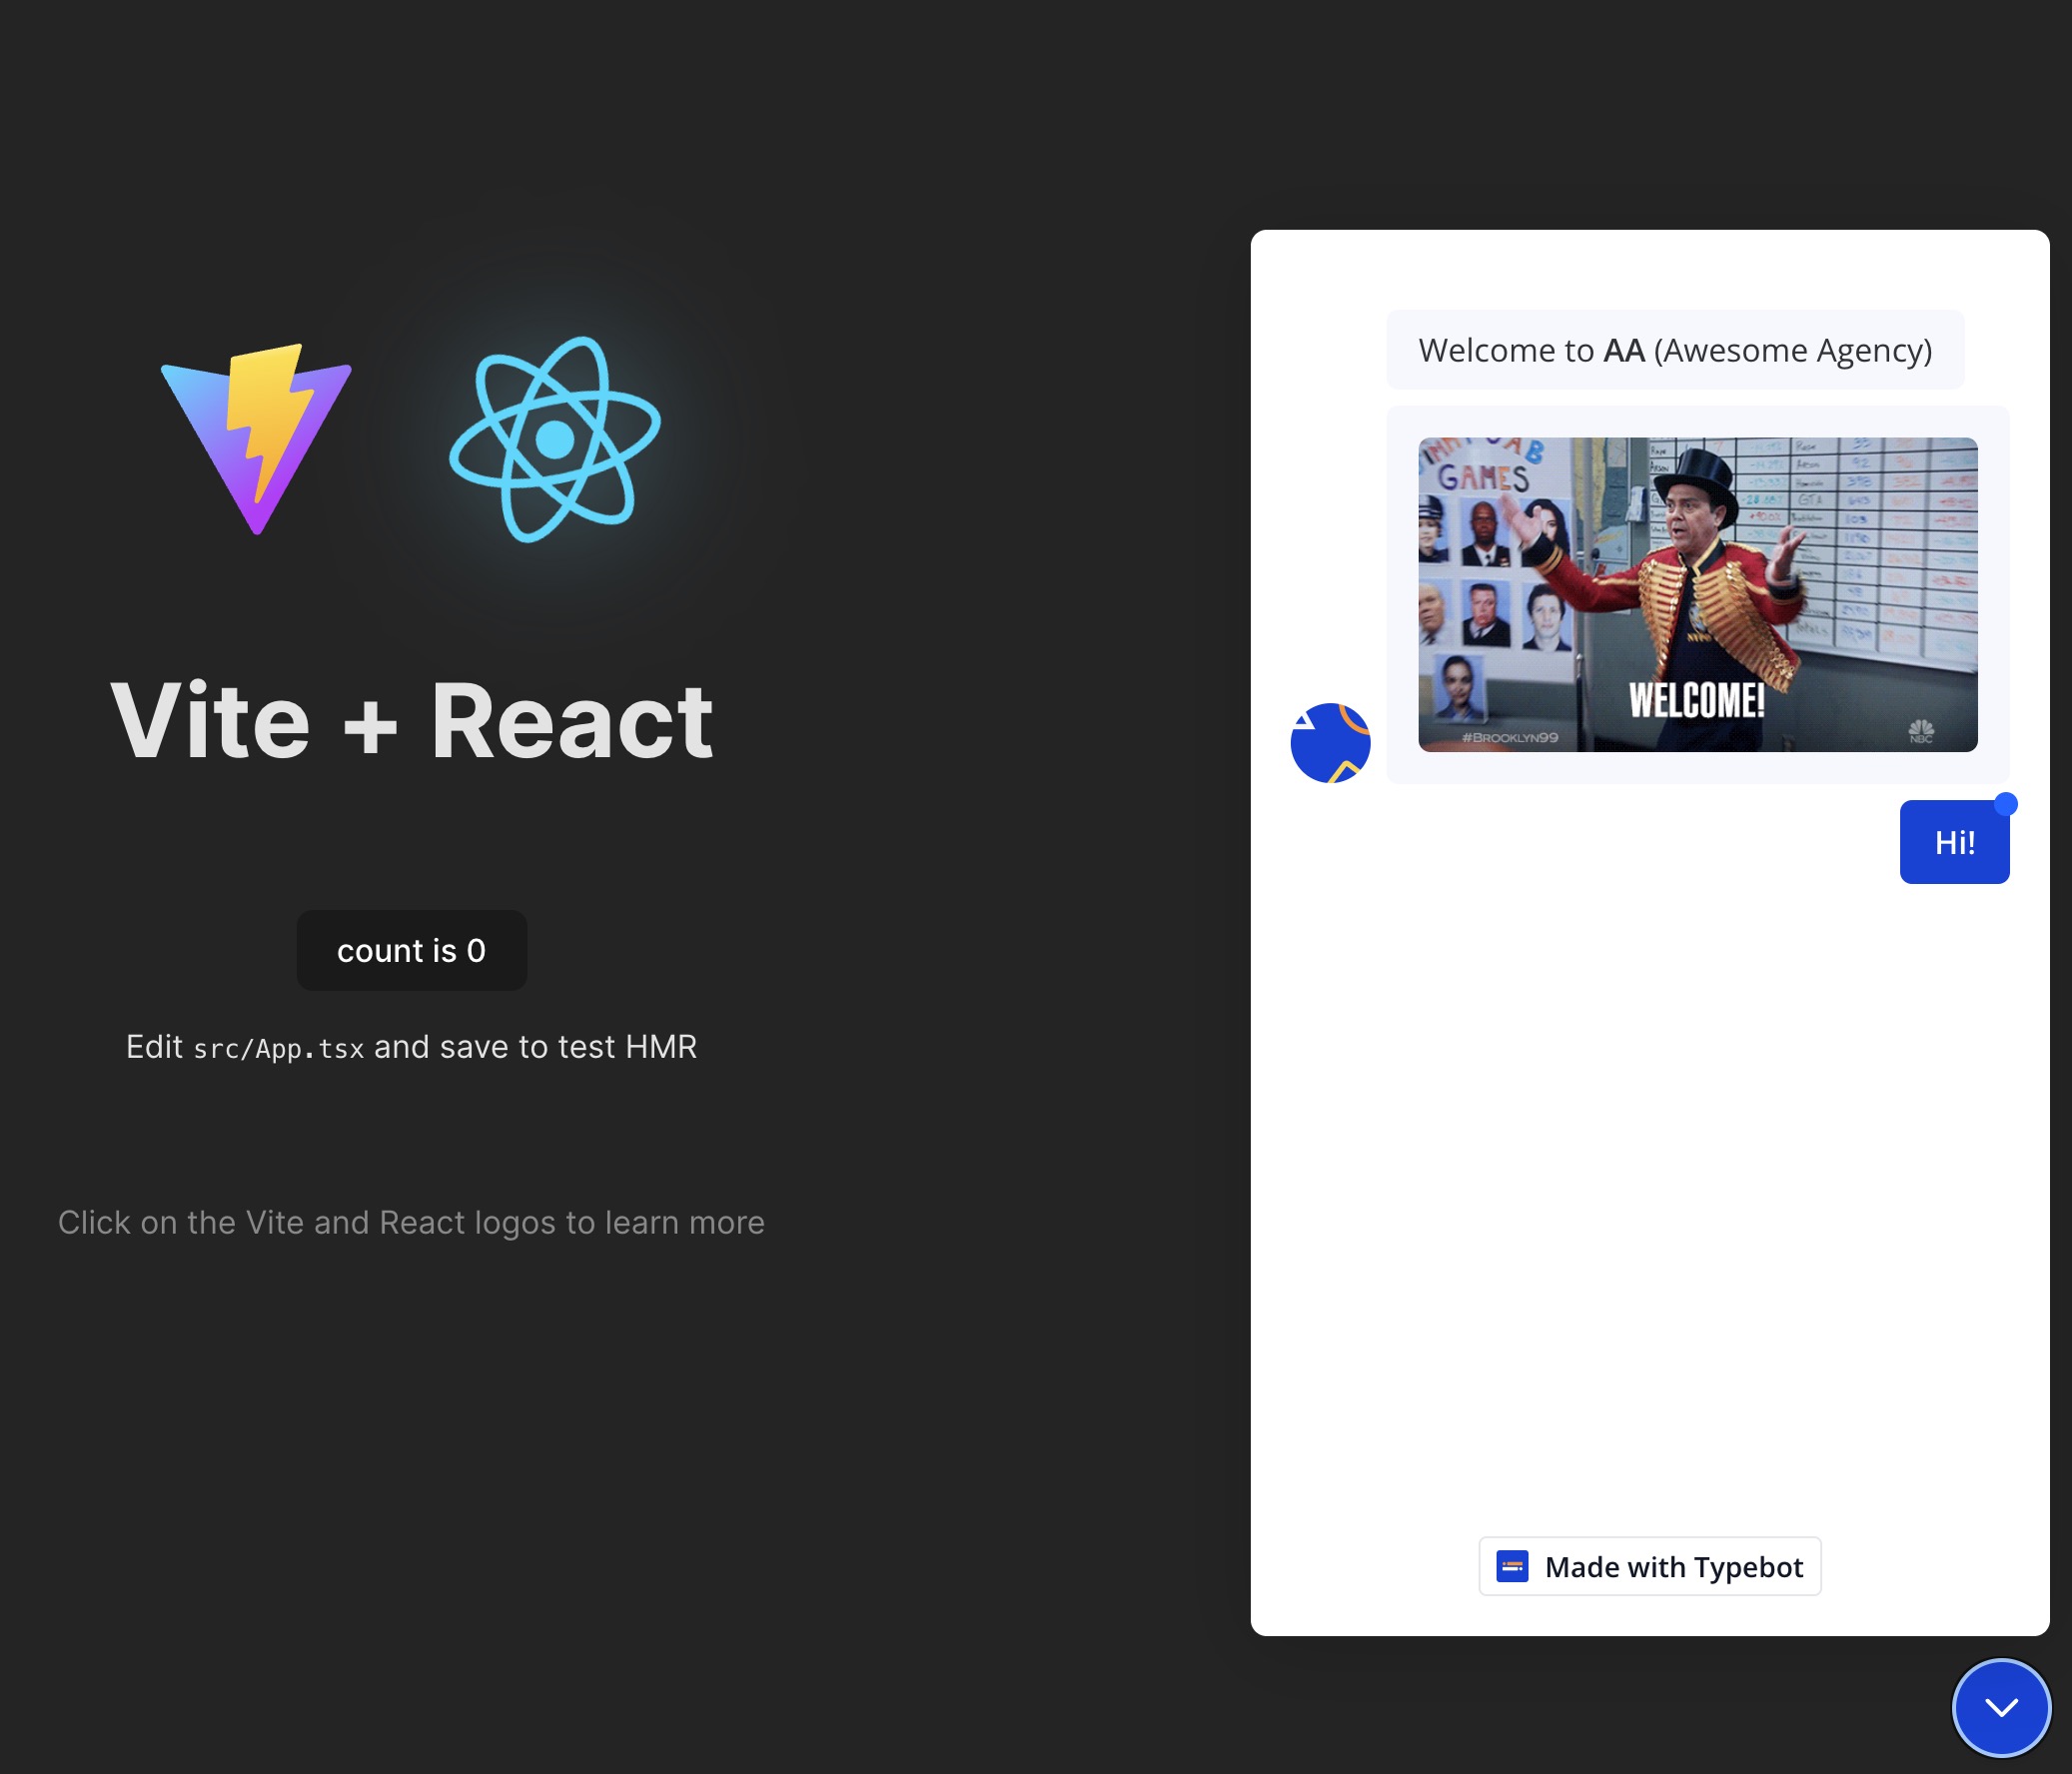
/>Here is what you will get:
Running and Testing Your Simple React Chatbot
- Start your React development server:
npm start- Open your app in a browser.
- Interact with the chatbot to test conversation flows.
- Check for:
- Correct message display.
- Proper input handling.
- Accurate conditional logic execution.
- Use Typebot's analytics to monitor performance.
- Iterate on your design based on user interactions and feedback.
These steps show you how to quickly create and integrate a functional chatbot into your React application using Typebot's no-code solution.

No trial. Generous free plan.
Method 2: Creating the Frontend and Calling the Typebot API
We will do the same thing, except that we will build our own chat UI. It will allow us to customize as we want.
Creating a React App with Vite
- Initialize a new React project:
npm create vite@latest my-chatbot -- --template react-ts
cd my-chatbot
npm install- Install additional dependencies:
npm install axios daisyui@latest- Configure Tailwind CSS and DaisyUI in
tailwind.config.js:
module.exports = {
  content: ["./src/**/*.{js,jsx,ts,tsx}"],
  plugins: [require("daisyui")],
};
Setting Up Typebot API
- Create a Typebot account and design your chatbot flow.
- Generate an API token in Typebot settings.
- Note your Typebot's public ID.
Creating Chatbot Components in React using Daisy UI
Create a ChatComponent.tsx file:
import React, { useState } from "react";

const ChatComponent: React.FC = () => {
  const [messages, setMessages] = useState<
    Array<{ text: string; isUser: boolean }>
  >([]);
  const [inputMessage, setInputMessage] = useState("");

  const handleSendMessage = async () => {
    if (inputMessage.trim() === "") return;

    setMessages([...messages, { text: inputMessage, isUser: true }]);
    setInputMessage("");

    // API call will be implemented here
  };

  return (
    <div className="flex flex-col h-screen">
      <div className="flex-1 overflow-y-auto p-4">
        {messages.map((message, index) => (
          <div
            key={index}
            className={`chat ${message.isUser ? "chat-end" : "chat-start"}`}
          >
            <div
              className={`chat-bubble ${
                message.isUser ? "chat-bubble-primary" : "chat-bubble-secondary"
              }`}
            >
              {message.text}
            </div>
          </div>
        ))}
      </div>
      <div className="p-4 bg-base-200">
        <div className="flex">
          <input
            type="text"
            value={inputMessage}
            onChange={(e) => setInputMessage(e.target.value)}
            className="input input-bordered flex-1 mr-2"
            placeholder="Type your message..."
          />
          <button onClick={handleSendMessage} className="btn btn-primary">
            Send
          </button>
        </div>
      </div>
    </div>
  );
};

export default ChatComponent;
Fetching Responses from Typebot API
Implement API calls in handleSendMessage:
import axios from "axios";

const TYPEBOT_API_URL = "https://typebot.io/api/v1/typebots";
const PUBLIC_ID = "your_public_id";
const [sessionId, setSessionId] = useState<string | null>(null);

const handleSendMessage = async () => {
  if (inputMessage.trim() === "") return;

  setMessages([...messages, { text: inputMessage, isUser: true }]);
  setInputMessage("");

  try {
    let response;
    if (!sessionId) {
      response = await axios.post(`${TYPEBOT_API_URL}/${PUBLIC_ID}/startChat`, {
        message: inputMessage,
      });
      setSessionId(response.data.sessionId);
    } else {
      response = await axios.post(
        `${TYPEBOT_API_URL}/${PUBLIC_ID}/continueChat`,
        {
          sessionId,
          message: inputMessage,
        }
      );
    }

    const botMessages = response.data.messages.map(
      (msg: { content: string }) => ({
        text: msg.content.richText[0].children
          .map((children) => children.text)
          .join(" "),
        isUser: false,
      })
    );

    setMessages((prevMessages) => [...prevMessages, ...botMessages]);
  } catch (error) {
    console.error("Error sending message:", error);
  }
};
Handling User Inputs and Responses in UI
Update the UI to display bot responses:
<div className="flex-1 overflow-y-auto p-4">
  {messages.map((message, index) => (
    <div
      key={index}
      className={`chat ${message.isUser ? "chat-end" : "chat-start"}`}
    >
      <div
        className={`chat-bubble ${
          message.isUser ? "chat-bubble-primary" : "chat-bubble-secondary"
        }`}
      >
        {message.text}
      </div>
    </div>
  ))}
</div>
Error Handling in API Calls
Implement error handling:
try {
  // API calls
} catch (error) {
  console.error("Error in chat flow:", error);
  setMessages((prevMessages) => [
    ...prevMessages,
    { text: "An error occurred. Please try again.", isUser: false },
  ]);
}
Finally the final result looks like this:

Deploying and Testing
- Build your React app:
npm run build- Deploy to a hosting service (e.g., Vercel, Netlify).
- Test thoroughly:
- Conversation flow.
- Error scenarios.
- Performance under load.
By following these steps, you can create a custom React chatbot frontend that interacts with the Typebot API, providing a seamless chat experience for your users.
If you're looking to build a website without diving into code, check out our list of best React website builders. They're real time-savers and let you create something professional without the headache of writing everything from scratch!
Method 3: Building the Frontend and Backend Yourself
Here we will do the same thing, but by building our own backend!
Initializing a React Project with Vite and TypeScript
- Create a new Vite project:
npm create vite@latest my-fullstack-chatbot -- --template react-ts
cd my-fullstack-chatbot
npm install- Install additional dependencies:
npm install axios daisyui@latestSetting Up the Backend with Express.js
- Create a
serverdirectory in the project root. - Initialize a new Node.js project:
cd server
npm init -y
npm install express cors dotenv
npm install --save-dev typescript @types/express @types/node @types/cors- Create a
tsconfig.jsonfile in theserverdirectory:
{
  "compilerOptions": {
    "target": "es6",
    "module": "commonjs",
    "outDir": "./dist",
    "strict": true,
    "esModuleInterop": true
  }
}
Creating RESTful API Endpoints for Chatbot Responses
Create a server.ts file in the server directory:
import express from "express";
import cors from "cors";
import dotenv from "dotenv";

dotenv.config();

const app = express();
app.use(cors());
app.use(express.json());

const PORT = process.env.PORT || 3001;

app.post("/api/chat", (req, res) => {
  const userMessage = req.body.message;
  // Chatbot logic will be implemented here
  res.json({
    response: `You said: "${userMessage}". This is a placeholder response.`,
  });
});

app.listen(PORT, () => console.log(`Server running on port ${PORT}`));
Creating Business Logic
Implement a simple chatbot logic in server.ts:
const generateResponse = (message: string): string => {
  if (message.toLowerCase().includes("hello")) {
    return "Hello! How can I assist you today?";
  } else if (message.toLowerCase().includes("help")) {
    return "I'm here to help. What do you need assistance with?";
  } else if (message.toLowerCase().includes("bye")) {
    return "Goodbye! Have a great day!";
  } else {
    return "I'm not sure how to respond to that. Can you please rephrase your question?";
  }
};

app.post("/api/chat", (req, res) => {
  const userMessage = req.body.message;
  const botResponse = generateResponse(userMessage);
  res.json({ response: botResponse });
});
Designing the Chatbot Interface in React using Daisy UI
Create a ChatComponent.tsx in your React src directory:
import React, { useState } from "react";
import axios from "axios";

const ChatComponent: React.FC = () => {
  const [messages, setMessages] = useState<
    Array<{ text: string; isUser: boolean }>
  >([]);
  const [inputMessage, setInputMessage] = useState("");

  const handleSendMessage = async () => {
    if (inputMessage.trim() === "") return;

    setMessages([...messages, { text: inputMessage, isUser: true }]);
    setInputMessage("");

    try {
      const response = await axios.post("/api/chat", { message: inputMessage });
      setMessages([
        ...messages,
        { text: inputMessage, isUser: true },
        { text: response.data.response, isUser: false },
      ]);
    } catch (error) {
      console.error("Error sending message:", error);
    }
  };

  return (
    <div className="flex flex-col h-screen">
      <div className="flex-1 overflow-y-auto p-4">
        {messages.map((message, index) => (
          <div
            key={index}
            className={`chat ${message.isUser ? "chat-end" : "chat-start"}`}
          >
            <div
              className={`chat-bubble ${
                message.isUser ? "chat-bubble-primary" : "chat-bubble-secondary"
              }`}
            >
              {message.text}
            </div>
          </div>
        ))}
      </div>
      <div className="p-4 bg-base-200">
        <div className="flex">
          <input
            type="text"
            value={inputMessage}
            onChange={(e) => setInputMessage(e.target.value)}
            className="input input-bordered flex-1 mr-2"
            placeholder="Type your message..."
          />
          <button onClick={handleSendMessage} className="btn btn-primary">
            Send
          </button>
        </div>
      </div>
    </div>
  );
};

export default ChatComponent;
Deploying and Testing
- Build your React app:
npm run build- Deploy to a hosting service (e.g., Vercel, Netlify).
- Test thoroughly:
- Conversation flow.
- Error scenarios.
- Performance under load.
By following these steps, you can create a full-stack React chatbot with a custom backend, providing a seamless chat experience for your users.
Connecting Frontend to Backend
Update the axios call in ChatComponent.tsx to use an environment variable:
const API_URL = import.meta.env.VITE_API_URL || "http://localhost:3001";

// In handleSendMessage:
const response = await axios.post(`${API_URL}/api/chat`, {
  message: inputMessage,
});
Error Handling and Debugging
Implement error handling in both frontend and backend:
// Frontend (ChatComponent.tsx)
try {
  // API call
} catch (error) {
  console.error("Error sending message:", error);
  setMessages((prevMessages) => [
    ...prevMessages,
    { text: "An error occurred. Please try again.", isUser: false },
  ]);
}

// Backend (server.ts)
app.use(
  (
    err: Error,
    req: express.Request,
    res: express.Response,
    next: express.NextFunction
  ) => {
    console.error(err.stack);
    res.status(500).send("Something broke!");
  }
);
Best Practices for State Management
For more complex applications, consider using state management libraries like Redux or Zustand:
npm install @reduxjs/toolkit react-reduxDeploying Full-Stack Chatbot Application
- Build the React frontend:
npm run build- Compile TypeScript for the backend:
npx tsc- Deploy the backend to a Node.js hosting service (e.g., Heroku, DigitalOcean).
- Deploy the frontend to a static hosting service (e.g., Netlify, Vercel).
- Set up environment variables for API URL in frontend deployment.
- Ensure CORS is properly configured on the backend for the frontend's domain.
This method provides full control over both frontend and backend, allowing for custom logic and integrations beyond what's possible with no-code solutions.
Advanced Features and Customization
Using Conditional Logic in Chatbots
Implement branching conversations based on user inputs:
const generateResponse = (message: string, context: any): string => {
  if (context.stage === "greeting") {
    if (message.toLowerCase().includes("help")) {
      context.stage = "help";
      return "What kind of help do you need? 1. Technical Support 2. Account Issues 3. Billing";
    } else {
      return "Hello! How can I assist you today?";
    }
  } else if (context.stage === "help") {
    if (message.includes("1")) {
      return "For technical support, please describe your issue.";
    } else if (message.includes("2")) {
      return "For account issues, please provide your account number.";
    } else if (message.includes("3")) {
      return "For billing inquiries, I'll transfer you to our billing department.";
    }
  }
  return "I'm not sure how to respond. Can you please clarify?";
};
Integrations with Third-Party Services
OpenAI Integration
import { Configuration, OpenAIApi } from "openai";

// Initialize the OpenAI configuration
const configuration = new Configuration({
  apiKey: process.env.OPENAI_API_KEY,
});
const openai = new OpenAIApi(configuration);

const generateResponse = async (
  message: string,
  context: any
): Promise<string> => {
  try {
    const completion = await openai.createChatCompletion({
      model: "gpt-3.5-turbo", // You can change this to a different model if needed
      messages: [
        {
          role: "system",
          content: "You are a helpful customer service assistant.",
        },
        {
          role: "user",
          content: `Current stage: ${context.stage}. User message: ${message}`,
        },
      ],
      max_tokens: 150, // Adjust as needed
      temperature: 0.7, // Adjust for more or less randomness in responses
    });

    return (
      completion.data.choices[0].message?.content ||
      "I'm sorry, I couldn't generate a response."
    );
  } catch (error) {
    console.error("Error calling OpenAI API:", error);
    return "I'm sorry, there was an error processing your request.";
  }
};
Google Sheets Integration
import { google } from "googleapis";

const sheets = google.sheets({
  version: "v4",
  auth: process.env.GOOGLE_API_KEY,
});

const logToSheet = async (message: string, response: string) => {
  await sheets.spreadsheets.values.append({
    spreadsheetId: "YOUR_SHEET_ID",
    range: "Sheet1!A:C",
    valueInputOption: "USER_ENTERED",
    requestBody: {
      values: [[new Date().toISOString(), message, response]],
    },
  });
};
Theming and Custom UI Design
Customize DaisyUI theme in tailwind.config.js:
module.exports = {
  // ...
  daisyui: {
    themes: [
      {
        mytheme: {
          primary: "#4B5563",
          secondary: "#60A5FA",
          accent: "#37CDBE",
          neutral: "#3D4451",
          "base-100": "#FFFFFF",
        },
      },
    ],
  },
};
Performance Optimization
- Implement lazy loading for chat history.
- Use React.memo for components that don't need frequent re-renders.
- Optimize API calls with debouncing or throttling.
import { useDebounce } from "use-debounce";

const [value] = useDebounce(text, 1000);
Building a React chatbot offers diverse approaches, from no-code solutions to full-stack implementations. This article explored three methods: using Typebot for rapid deployment, integrating Typebot's API for customization, and building a complete solution from scratch.
Each approach provides unique benefits, allowing developers to choose based on their project requirements and technical expertise.
As chatbots continue to evolve, the potential for creating more intelligent, responsive, and personalized conversational interfaces in React applications is boundless.
No trial. Generous free plan.